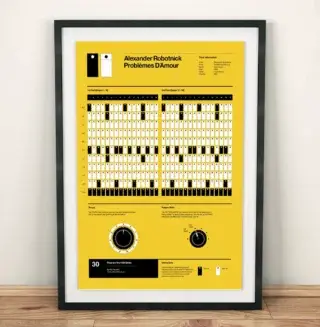
This time on Beat Dissected we’ll be showing you how to create groovy electro drums in the style of Alexander Robotnick’s iconic ‘Problèmes D’Amour’ using only Ableton’s stock samples and effects.
‘Problèmes D’Amour’ may be a legendary song nowadays but that certainly wasn’t always the case. The track, Italian musician Maurizio Dami’s first single under the name Alexander Robotnick, sold 10,000 copies upon its initial release in 1983. Today that may seem like a success but back in those days, it was considered to a flop.
Maybe the release just didn’t get to the right ears initially or maybe the blend of electro and disco with a funky 303 bassline and French Vocals sung in a Russian accent was way ahead of its time? Either way, as the years have passed ‘Problèmes D’Amour’ has rightly become more and more popular.
Helped in part by a tough American remix courtesy of Francois Kevorkian, its inclusion in the 1985 comedy, European Vacation and its rediscovery in the 2000s the song has stood the test of time and cemented its status as a classic of electronic music.
Spec
Tempo
120.7Swing
'Swing Logic 16ths 55'Sounds
AbletonIn this Beat Dissected we’ll be making a beat inspired by the groovy 808 drums of ‘Problèmes D’Amour’, using only Ableton’s stock samples and effects.
Here’s what we’ll be making:
Here’s the beat with some music for context:
Want to follow along? Download the session for free:
Remember to click any image to enlarge!
Step 1: The Kick
To create the kick for this beat we are going to be layering two different kick samples together. First, place a Drum Rack on an empty midi channel. Then find ‘Kick 808 Tone’ and drag it into a channel on the Drum Rack. This kick is going to provide the sub/body for the final kick.
If it’s not already, set the Simpler to Classic mode and then adjust the Decay to 206ms, the Sustain to -19db and the Release to 104ms. Afterwards, program a standard four on the floor pattern as shown below.

Add an instance of EQ 8 to the kick to help shape the sound. Cut around 4.9db at 505hz and then around 1.5db at 163Hz. After that boost just over 1db at 70hz to help add more punch to the Kick.
Now it’s time to add the second layer. Select ‘Kick 808 Click Layer’ and add it to the Drum Rack. This click will add more high-end presence to the final kick and help it cut through the mix. Program the same four-to-the-floor pattern as the first kick.
Then set the Simpler to classic mode and adjust Decay to 300ms and Sustain to -2.9db. Use Simpler’s built-in high pass filter to cut everything below 100hz. This will help ensure there isn’t too much low-end information in the final kick.


Here’s the beat so far:
Step 2: Clap and Snare
Select the sample ‘Clap 808’ and drop it into the Drum Rack. Program the pattern shown below, placing the clap on the second and fourth beat of each bar. Lower the Decay of the sample to 17.8 ms and the Sustain to -8.6 dB, and then increase the Release to 104 ms.

Now let’s add the snare. Find the sample ‘Snare 808 Tone 3r’ and add it to the Drum Rack. Program the same pattern as the clap and add a fill at the end of the fourth bar as shown below. Leave the envelope as is, but make sure to adjust the velocities of the fill snares so that they don’t hit as hard as the snare on the two and four.

Here’s what the beat is sounding like now:
Step 3: Hi-Hats
Add the samples ‘Hi Hat Closed 808’ and ‘Hi Hat Open 808’ to the Drum Rack. To help our sampled hats have more of the feel of the original TR-808 set both the open and closed hat samples to Choke group 1.

Doing this means that only one of the samples in the Choke group can be played at a time and will also mean that a sample will cut out when another one in the Choke group is triggered. This gives a similar feel to the TR-808, which only had one voice for both the open and closed hats.
To shape the open hat sample adjust the Decay to 414 ms, the Sustain to -12 dB, and the Release to 7.87 ms. Engage Simpler’s built-in high pass filter and cut everything below 351 Hz.

Then add Ableton’s Eroison to the channel. Select the Noise mode and set the Freq to 9.52 kHz, the Width to 0.30 and the Amount to 1.07. Pan the sample to the right and afterwards, program the open hat on every offbeat as shown below.
To program the closed hat, simply place a midi note on every 16th note except for the offbeat. Slightly lower the velocity of the hats leaving the onbeat unaltered. Doing this can help add more movement to the drums.
Finally, pan the closed hat to the right and then use simpler’s built-in high pass filter to cut everything below 351 Hz.

Here’s the beat now:
Step 4: Rimshot
In ‘Problèmes D’Amour’ the rimshot plays a busy syncopated rhythm that helps add a lot of groove to the beat. Find the sample ‘Rim 808’ and add it to the Drum Rack. Program the pattern shown below and then adjust the velocities of the hits accenting the weak beats, which helps to add syncopation.

Finally, pan the sample to the left.
Listen to the beat now:
Step 5: Swing and Bus Processing
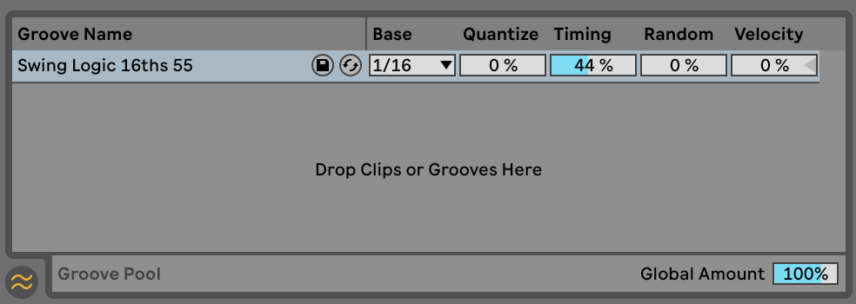
To add swing, go to the browser on the left-hand side of Ableton, enter the Grooves page, and find ‘Swing Logic 16ths 55’. Drag this into the groove pool and then apply it to the Drum Rack.
Adjust the Timing setting to dial in the Groove you want. Here Timing is at 44%.
Now it’s time to add some Bus Processing. Drag an instance of Utility and apply it to the whole of the Drum Rack. Engage the Bass Mono function and set the frequency to 200 Hz. This puts everything below 200 Hz in mono, which will help in the mixing process, but also helps to bring more focus to the low end.
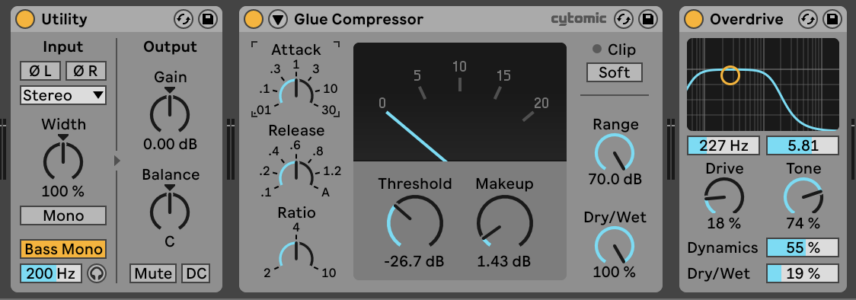
Next, add a Glue Compressor to the Drum Rack. Lower the Threshold to -26.7 dB and then increase the Makeup to 1.43 dB. Then, apply an Overdrive to the Drum Rack, setting the filter frequency to 227 Hz and the filter width to 5.81. Increase the Dynamics to 55% and the Tone to 74%. Decrease the Drive to 18% and the Dry/Wet to 19%.
Afterwards, apply an instance of Drum Buss. Adjust the Drive to 19%, the Crunch to 10%, and the Boom to 13%. Set the Damp to 12.2 kHz and the Transients dial to 0.11. Reduce the Output by -5.89 dB to avoid too much gain being added and then adjust Dry/Wet to taste, here it’s at 86%.

Now, add a Saturator and select the Soft Sine mode. Increase the Drive to 4.5 dBs and then lower the Base to -2.29 and the Output to -5.14 dB. Finally, adjust the Dry/Wet to taste, here it’s at 46.9%.
Next, add an instance of Erosion using the Wide Noise Mode. Set the Freq to 5.35 kHz, the Width to 0.30 and the amount to 4.28.
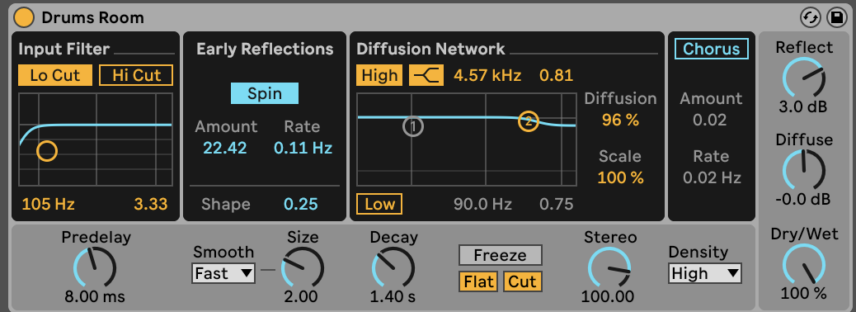
Finally, send the Drum Rack to a Reverb using the Drums Room preset. Engage the Input Filter on the Reverb and cut everything below 105 Hz.
Here’s our final beat:
Here’s the beat with some music for context:
Want more Alexander Robotnick content? Check out Attack’s interview with the electronic music legend and our full Deconstructed of ‘Problèmes D’Amour’.

