u-he are makers of award-winning software synthesisers and effects including Diva, Repro-1, Zebra2, Hive, Bazille, Presswerk and Satin.
Visit U-he

u-he are makers of award-winning software synthesisers and effects including Diva, Repro-1, Zebra2, Hive, Bazille, Presswerk and Satin.
Visit U-heSynth Secrets is a series of programming tutorials in which we show how to make a range of classic and new synth sounds using plugins such as Massive, Sylenth and Predator.
This week we use U-He’s DIVA plugin to create a low-slung analogue-style bass.
Here’s the MIDI we’re using. Note the varying velocities of the notes (red is louder) which come into play in step 5. Not also the overlapped notes.
Start by selecting one of the initialised patches. Click the Patches tab (middle bottom) then click on 8 TEMPLATES from the Local list (bottom left). Finally, select the INIT Jupe-8 patch – a useful starting template that includes VCOs (voltage-controlled oscillators) and analogue-style envelopes.
Click on the Main tab to return to the synth. Start by making the patch monophonic – it’s a bass sound so we only want it to play one note at a time. Do so in the small section above the Main tab by clicking on the box titled Mode then selecting mono from the drop-down menu. Next, in the TUNING section above, add some glide by turning the Glide dial until it’s a third of the way round.
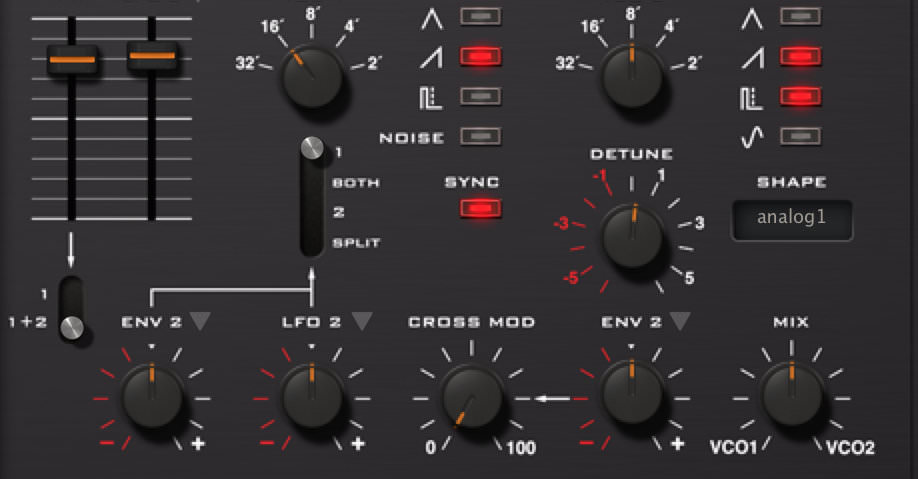
Now move to the oscillator section in the top left of the synth (the panel entitled DUAL VCO). First, rotate the VCO 1 knob to the left to transpose the oscillator down an octave from 8′ to 16′. Next, cross to the VCO 2 knob and the list of waveforms on the right. The sawtooth will have a red light highlighted to indicate it’s the waveform selected for this oscillator. Click on the red light next to the waveform underneath to add a pulse wave. Now turn the DETUNE knob below to around 0.25 to detune the two oscillators. To the left of the DETUNE knob there’s a SYNC button. Syncing the oscillators gives a distinctive tonal characteristic to the patch.
To the left of the VCO1 knob is a PW (pulse width) slider, which is linked to the pulse wave set up on VCO2. Increase the PW setting to 79.00. Next, increase the LFO 2 setting alongside it to around 31.0 in order to modulate the pulse width with an LFO, adding movement and attitude.
Now to the filters. In the panel to the right of the VCO section you’ll see a FREQUENCY slider with a drop-down menu below that reads HPF I PRE. Click on the menu, select FEEDBACK, then turn the feedback dial above to the 12 o’clock mark. The feedback control routes the output of the synth back into the filter, generating even more weight and intensity.
(Note: Before playing back the synth at this point you might want to reduce the synth’s master volume – the output control can be found at the top right corner of the synth.)
With the filter routing set up, toggle the Rough/Clean switch to Rough for a rawer sounding filter, then reduce CUTOFF to 41.00 and push up RES to 20.00. The sound disappears as it’s filtered right down.
To set up the filter so that it’s envelope-controlled, turn the ENV 2 dial below the CUTOFF slider to 100.00. The filter is now being shaped by ANALOGUE ENV 2 in the far right panel.
Under the right-hand envelope panel, ANALOGUE ENV 1 controls the amplitude while ANALOGUE ENV 2 controls the filter. Start by pushing the decay and sustain sliders (titled D and S respectively) of ANALOGUE ENV 1 all the way up to the top and push R (release) up to around the half-way mark.
Now move down to ANALOGUE ENV 2 and move the sliders to yield a fast attack and medium decay, sustain and release (as pictured below).
To the right of the ADSR controls are additional VEL (velocity) and KYBD (keyboard tracking) sliders. Push up the VEL slider of ANALOGUE ENV 2 so that the filter envelope is further modulated by note velocity. The velocity changes programmed into the MIDI pattern earlier now add further movement and variation.
With the sound complete, let’s add some effects. First up, in the EFFECT 1 panel (bottom right) click to highlight the button to the left of Chorus1 to turn it on. By default, the wet control is set to 100%, which is too much for a bass sound. Reduce it to around 25% for a more subtle chorus effect that adds depth and movement.
Now get automating! Tweaks to the filter cutoff, envelope modulation settings and filter envelope all create movement in the sound. We’ve also added some reverb and delay to the patch via bus sends so we can process the effects independently of the sound.
30th June, 2015

u-he are makers of award-winning software synthesisers and effects including Diva, Repro-1, Zebra2, Hive, Bazille, Presswerk and Satin.
Download the demos and try them for yourself at www.u-he.com
Attack Magazine is funded by advertising revenue. To help support our original content, please consider whitelisting Attack in your ad blocker software.
x
09.18 PM
Very nice tutorial. Thank you so much!