Today on Beat Dissected we’ll be showing you how to create an electro beat inspired by Cybotron’s timeless classic ‘Clear’, using only Ableton’s 808 Core Kit and stock plugins.
Founded in Detroit in 1981 by Juan Atkins and Richard “3070” Davis, Cybotron were among the very first pioneers of Detroit electro. Their wildly experimental sound and unique Afro-futurist ethos, drawing heavy inspiration from science fiction, helped lay the groundwork for what would become Detroit techno. It’s almost impossible to put into words the influence that the group has had on electronic music as a whole.
Over the course of their time together, Cybotron released many classic records, but perhaps none have had the same impact as their seminal 1983 track, ‘Clear.’ The track, combining robotic vocals with tough 808 beats, synth stabs, plucky arpeggios, and squelchy basslines helped lay a framework for the electro genre that can still very much be heard in productions today.
Spec
Tempo
125 BPMSwing
50%Sounds
AbletonThis time on beat dissected we’ll be showing you how to make electro drums inspired by ‘Clear’ with only Ableton’s 808 Core Kit and stock plugins.
Here’s what we’ll be making:
Here’s the beat with some music for context:
Want to follow along? Download the session for free:
As ever, click any image to enlarge!
Step 1: Kick
First, load an instance of Ableton’s 808 Core Kit onto an empty Midi Channel. Then program the following Midi pattern for the Bass Drum.
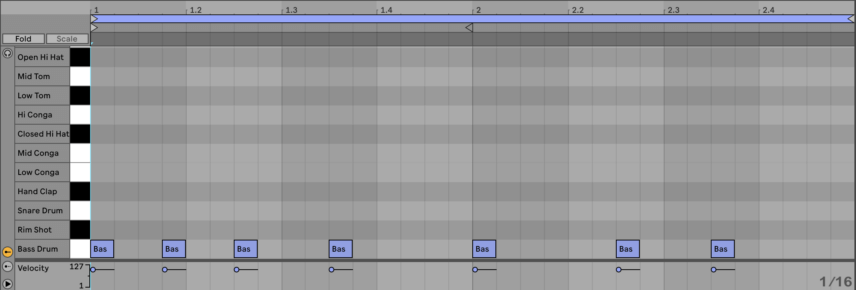
Find the Kick’s macro controls and decrease the Tone to 9 and the Decay to 21. Finally, add 1.89 dBs of drive for a bit more punch.

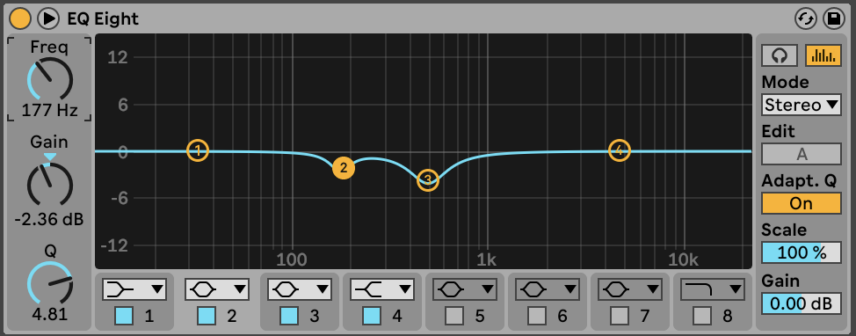
Add an instance of EQ Eight to the Kick and make two cuts, one around 180 Hz, with a high Q value and another deeper cut at around 500 Hz with a smaller Q value. This EQ will remove any unwanted boxiness from the kick and help to clear up space in the mix for other low midrange elements like the bassline.
Here’s the beat now:
Step 2: Clap and Snare
For the clap and snare, program the pattern shown below placing a Midi note on every second and fourth beat.
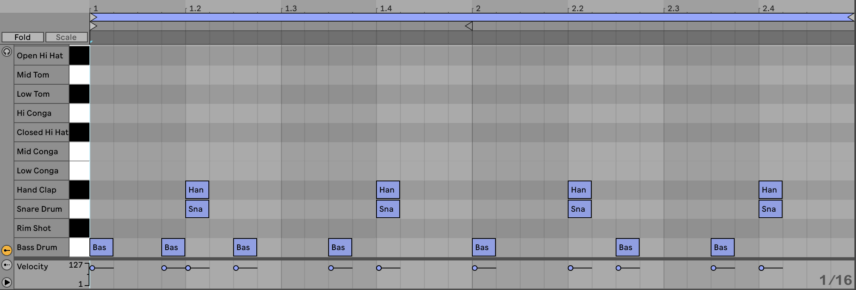
Make sure the Clap is in Classic mode and then reduce the sustain to -3.5 dB. and the volume to -10.9 dB.

For the snare, we are going to edit the included Macro controls the same way we did for the Kick. Increase the Tone control to 118 and the Snappy control to 127. Leave the envelope as is, but slightly increase the volume to -9.14 dB.

Here’s the beat now:
Step 3: Hi-Hats
Program the Midi pattern shown below for the open and closed hi-hats.
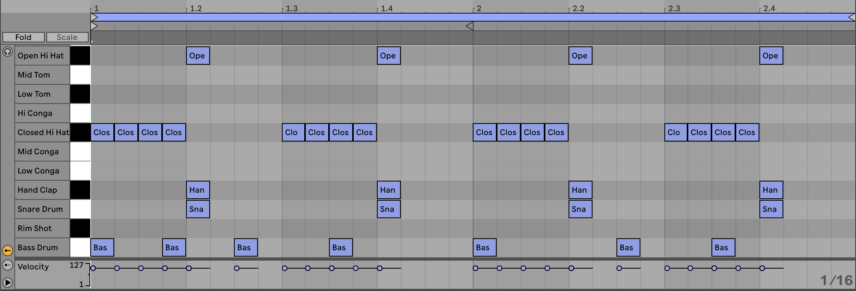
Increase the Attack of the closed hi-hat to 0.47 ms for a slightly less harsh transient. Then, engage Simpler’s built filter, set it to high-pass mode and adjust the Frequency to 317 Hz, removing any unwanted low-end. Lastly, pan the hat slightly to the right.

Next, go to the macro controls of the open hi-hat and reduce the decay to 375 ms. Same as with the closed hat, engage the built-in filter in low-pass mode and set the Frequency to 300 Hz, again removing any unwanted low-end. Pan the open hat slightly to the left.

Here’s the beat now:
Step 4: Buss Processing
To add buss processing we are going to be adding effects to the entire 808 Core Kit.
First, add an instance of Drum Buss. Increase the drive to 25%, the Crunch to 20%, and the Boom to 13%. Adjust the Damp control to 15.8 kHz, we don’t want to be squeezing the high end too much here.
Finally, decrease the Out to -5.15 dB to avoid adding too much gain to the signal and then adjust Dry/Wet to taste. Here it’s at 96%, leaving a strong effect.
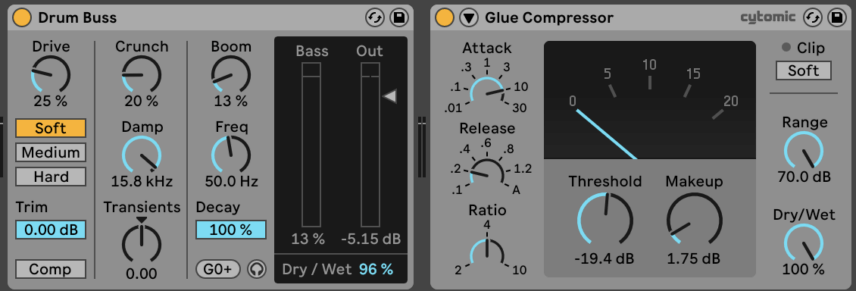
Next, add an instance of Glue Compressor. Increase the Attack to 10 to avoid squashing the transients unnecessarily and then decrease the Release to .2 to help add punch. Lower the Threshold to -19.4 dB or where the meter shows around -4 dBs of gain reduction.
Finally, A/B the sound (turn the Glue Compressor on and off) while increasing the Makeup to where the signal is the same volume if the compressor is on or off. This is important because it allows us to hear what the compression is doing without being tricked by any increases in volume. Here the Makeup is set at 1.75 dB.
After the compressor, add an instance of EQ Eight. We’re not going to be doing much here just tame some unwanted resonances in the high-end. Select a notch filter and cut -3.33 dB at 7.58 kHz. Make sure you are using quite a high Q to avoid cutting too much from the top end. Here the Q is set to 6.16.

The last step in our buss processing chain is going to be some reverb. Add an instance of Ableton’s Reverb using the Drum’s Room preset. Engage the Lo Cut on the Input filter and then adjust the frequency to 3.76 kHz and the amount to 4.35. Increase the Diffuse to 1.2 dB and then lower the Decay to 710 ms. Finally, adjust the Dry/Wet to taste. Here it is at 7.9%.
This is what our final beat sounds like:
Here’s the beat with some music for context:
Want more? Be sure to check out the rest of our Beat Dissected series.
