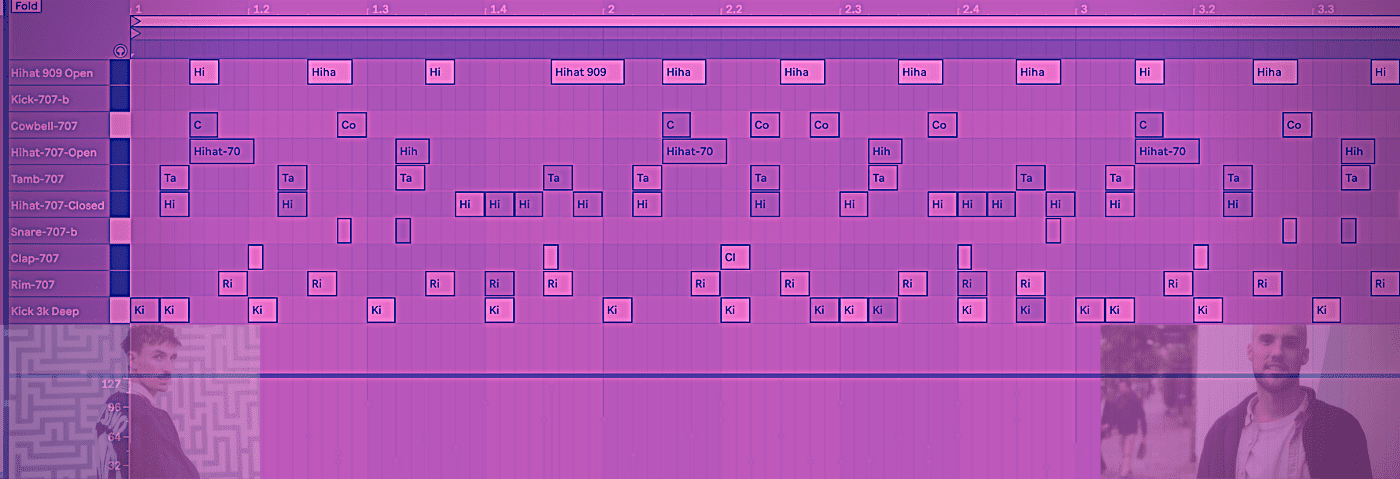
In this latest Beat Dissected, we’re going to program a house beat inspired by the likes of Project Pablo, Ross from Friends and Hidden Spheres.
Beat Dissected is a regular series in which we deconstruct drum patterns, showing you how to program them in any DAW. Just copy our grid in your own software to recreate the loop. To enlarge any photo, just click on the image.
If you find this tutorial helpful you might also enjoy our book “The Secrets of Dance Music Production“.
Here’s the beat we’re building today:
Here’s the beat with a keyboard programmed in for context:
Spec
Tempo
123 BPMSwing
59%Sounds
AbletonStep 1
Select the drum rack 707 Flight Time Kit. In the first cell, change the kick drum sample to the sound Kick 3k Deep. You can use Q and Hot-Swap to do this quickly.
Next, delete the Audio Effects titled Drum Machines 2.0 Audio Effects and replace it with Basic Percussion Effects. As before, using Q and Hot-Swap makes this process straightforward. We now have the sounds we’re going to use.
As ever, let’s begin with the kick drum. Program this pattern below and pay special attention to the velocities. Velocities are crucial to making it sound more ‘human’.

We’ve left the sound as is. The only amends are we dialled back the Volume to -12.dB. On the Device Macros, we reduced Comp to 44, added 6.3% Reverb, turned Low Cut anti-clockwise till 10.9 Hz and pushed the gain to 7.58 dB.
Moving to the top four macros, the Gain remains at its preset setting, Transient moves to 0.65, Echo Amount 5 and Echo Time remains untouched.

Here’s the progress so far:
Step 2
Next is the Rim, Clap and Snare. Program the following pattern.

As in Step 1, there is very little sculpting applied but again be sure to program velocities similar to the above to get some much needed groove.
The Rim is untouched as the sound works well. For the Clap, increase the Vol>Vel to 38%. On the Snare, it’s a similar process to the Clap. Increase the Vol<Vel to 100% and the total Volume to -5.71 dB. Working with the Vol<Vel settings alongside velocity programming can really bring out nuances in your drum programmings. In this particular case, we wanted our snare ghost notes to be as subtle as possible.
Here’s how that sounds:
Here’s the progress so far:
STEP 3
Step 3 follows the pattern above: very little sound manipulation and a higher focus on the groove and feel. To begin with, program the below pattern.

Beginning with the hi-hat and ascending up the Piano Roll, switch Playback Mode to Classic. The biggest changes here is to the sound. Toggle Filter and apply the third filter from the top in the dropdown menu. Directly below, switch the circuit option from OSR to Clean. Reduce the Frequency to 1.78 kHz and boost Res to 43%. Click Controls in the top right of the Device and dial in 34% Spread and 16L Pan.
The Tambourine is untouched. For the Open hi-hat change the mode to Trigger, reduce the resonance and add a minor amount of Drive to taste. The important part here is the Trigger. This allows our MIDI notes to cut off exactly as programmed making the Open hi-hat “choke” where necessary. Notice in the pattern some MIDI notes are longer than others and the shorter notes sound “choked”. Hear the difference between them. It’s subtle but these small details go a long way.
Here’s how that sounds:
Here’s the full progress so far:
Step 4
For the last step in our programmed drums, we have a Cowbell (but of course) and another open hi-hat. It’s not too common to have two different open hi-hats in one pattern but if it sounds ok…don’t be a stickler to the rules! Program the below pattern:

For the Cowbell, reduce the Frequency 1.67 kHz. The reduction in the top-end pushes the sound into the back of the mix. For the open hi-hat, firstly swap the default sound in the Flight Kit from Ride 707 to Hihat 909 Open. Pitch it up with Trans to +5 st. Amend the Trigger to Gate in order to achieve the same effect as the previous step.
Here’s how that sounds:
Here’s the full progress so far:
Before we move on, the final step with the programmed drums is to add the swing! Open the Groove Pool and find MPC 16 Swing – 59. For this tutorial we’ve chosen Base > 1/32 | Quantize 100% | Timing 100% | Random 0% | Velocity 100%.
Step 5
We don’t have a tambourine to hand but no bother we can take a shortcut.
Load a new Audio Track and drag from Ableton’s browser Groovy Tambo 90bpm. Set it to loop for 4 bars on Warp. Let’s keep it simple. Transpose it -3 st and sidechain the whole sample to the kick drum of our drum pattern.

Here’s how that sounds:
Heading to the Master track, add in Drum Bus and a Limiter and the final result is:
And with a keyboard for context:
