In this latest Beat Dissected, we show you how to program a Lo-Fi house beat full of nostalgic warmth and inspired by the sounds of producers such as DJ Boring, DJ Seinfeld & Ross From Friends.
Beat Dissected is a regular series in which we deconstruct drum patterns, showing you how to program them in any DAW. Just copy our grid in your own software to recreate the loop and to use the same one-shots you can download the session that we used.
To enlarge any photo, just click on the image.
Here’s the beat we’re building today:
Spec
Tempo
118 BPMSwing
MPC 8 Swing 56Sounds
Lo-fi Sample Packs, Processed Drum Machine, Found SoundsFor this edition of Beat Dissected, we’ll be creating a beat inspired by lo-fi production techniques. This approach to sound design and processing isn’t limited to techno or house but has become increasingly popular across the board.
Born out of a desire to recreate all that is wonderful with analogue hardware, the lo-fi aesthetic takes ‘machine warmth’ to another level often using bit crushers, saturators, tape machines and more in order to process the audio, often adding noise into the signal flow, reducing high frequencies whilst simultaneously distorting the rest of the signal.
The irony is that many lo-fi producers are actually working ‘in the box’ to glitch, grind and warm their sounds and that’s exactly what we’ll be doing here! We’ll be working with samples from the Dark Techno Touch Loops sample pack, Ableton’s native effects and a free VST to create the following beat.
Please note that since making this tutorial Izotope’s Vinyl will only work with an installation workaround when using macOS Catalina. To learn more visit Izotope’s help guide. Failing that, Ableton’s native Vinyl Distortion can also work.
If you have suggestions or would like to see particular genres dissected, please leave a comment below.
Step 1
Add the kick sample into an empty cell within a Drum Rack instrument. It’s worth noting that whilst this kick sample is pretty much ready-rolled for our needs, we’ve opted for something that has a nice weight and punch without a ‘clicky’ transient and indeed hardly any top frequency at all.
Add an instance of EQ Eight and sweep away any sub 30Hz frequencies. Programme a 2 bar pattern with the kick, adding a couple of syncopated hits in the 2nd bar.


Step 2
Next up the layered claps!
Place the Clap hit on 2nd and 4th beat of each bar but manually add track delay by dragging each hit several milliseconds ahead of the kick. Pitch the Clap sample down -2 semitones for a dirtier and more gritty sound.
Next, layer our Clap with the Noise Clap, placing hits (with the same track delay) on the first upbeat in each bar. This adds a tasty noise decay to every other clap hit.


Step 3
Add some texture sounds into the loop. This will glue the sounds together, filling the spaces in between hits. This is a useful production technique not only in lo-fi house but also applicable in whatever style you write in. By adding these layers earlier in the process, you should be able to notice what a difference using textures in this way can make.
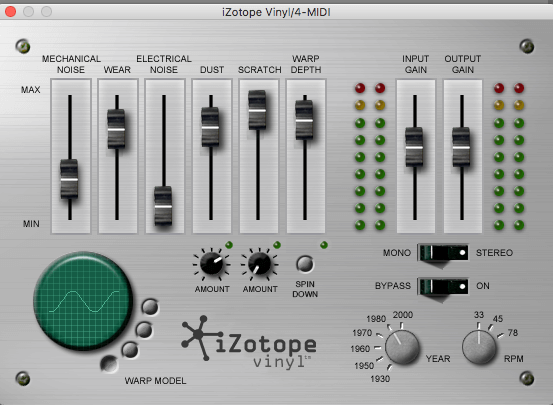
To begin with, load Izotope Vinyl (a free VST) onto a new MIDI Instrument channel. Dial-in a touch of Mechanical Noise, push up the Wear, Dust, Scratch and Warp Depth faders, whilst also pushing up the Dust Amount control and change the Year to 1980. Follow this with an EQ, sweeping away any low rumble but also any overly bright frequencies.
Audio PlayerStep 4
Load our Texture Loop in a drum cell. In Simpler set the sample to Loop, take off Snap and turn on Warp. This means that simply pressing and holding on the respective note for the sample will loop it in time with our beat.
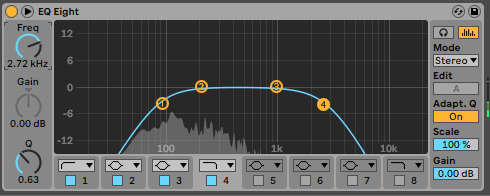
Program the note for the duration of our loop (2 bars). The only processing we apply is an EQ Eight, rolling off the low frequencies below 150Hz. This is a more prominent texture than the vinyl effect, but really warms up the beat and adds depth.
Audio PlayerStep 5
With our textures doing their job we can now turn our attention back to the percussion and add a couple of sounds for extra groove and drive.
Firstly, load the CH sample, programming hits in the offbeats. Shorten the tail of the sound, so it’s not too trashy by sweeping back the Decay a little. Also, add an EQ and sweep frequencies above 10kHz.
We follow this with our Tom sample. Draw in a combo of syncopated and offbeat hits. As before, shorten the sample so it doesn’t interfere with the other sounds too much, achieving this by taking off the Sustain and dialling back the Decay.
Lastly, pitch the Tom sample down -1 semitone and add an EQ sweeping away the low and high frequencies.


Step 6
With all our hits in place it’s time to make it swing with MPC 8 Swing-56 from Ableton’s Swing and Groove Library. This Swing template also adds a slight delay to the offbeats as well as the syncopated hits enhancing the loose and lo-fi swung aspect.
Group the Drum Rack and vinyl track together as we’ll process everything in one track. There are many approaches you could adopt for processing lo-fi drums, any combination of saturators, tape emulations and bit reducers are worthy candidates.
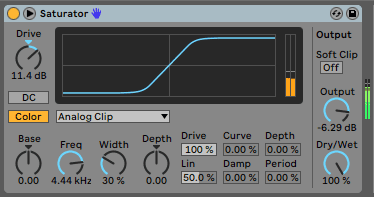
However, as our drums sound suitably crunchy already we opt for a single instance of Ableton’s Saturator. Keeping the Analog Clip mode active, we push up the Drive to 11db and dial back the Output, to level compensate. This really brings the drums to life, adding a lovely driven tone, especially on the kick drum.


