In the latest Beat Dissected, we build a gritty, in-your-face techno beat, constructed mainly from analogue hits.
Beat Dissected is a regular series in which we deconstruct drum patterns, showing you how to program them in any DAW. Just copy our grid in your own software to recreate the loop.
Here’s the beat we’re building today:
Spec
Tempo
130-135 bpmSwing
50-60%Sounds
Vintage drum machine samples and analogue hitsStep 1
For this beat, we’re mainly going to use analogue drum samples as our sound sources, processing them with filters and saturation to create a distinctive in-your-face techno sound.
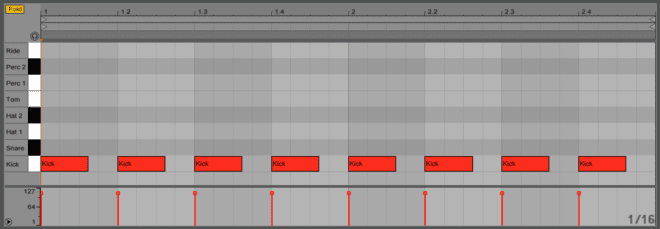
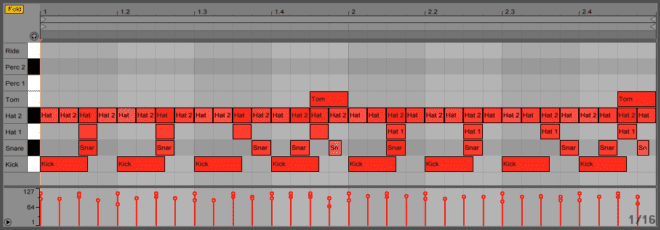
The kick is the main exception to the analogue rule. We’ve chosen a LinnDrum sample for its unique snappy attack, then run it through heavy compression and analogue overdrive to add character and harmonics. Finally, we’ve boosted the low end and removed made a small cut around 250 Hz. The kick pattern is a simple four-to-the-floor beat.
Audio PlayerStep 2
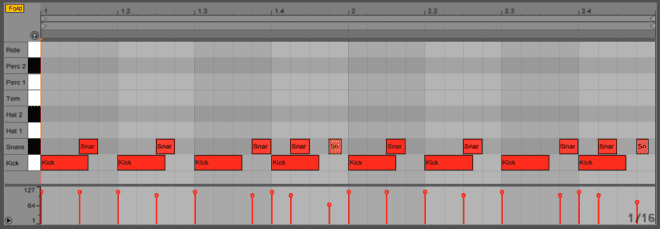
For the snare, we’ve used a Roland TR-808 sample as a starting point, but we’ve broken with convention here in a couple of ways. Firstly, the snare pattern is unusual: the snare hits on off beats and 16ths rather than on the two and the four as you might normally find it in a lot of house and techno beats. There’s a small amount of velocity variation to add interest, but it’s mainly the placement of these snare hits that gives the beat a lot of its character. The snare effectively works more like an open hi-hat normally would, filling the gaps between kick drums.
Secondly, the snare has been pitched down extensively (nearly a full octave from the original 808 sample) and then run through a 24dB/octave low-pass filter with mild resonance. The resulting sound isn’t quite a snare any more, but an indefinable percussive sound.
Step 3
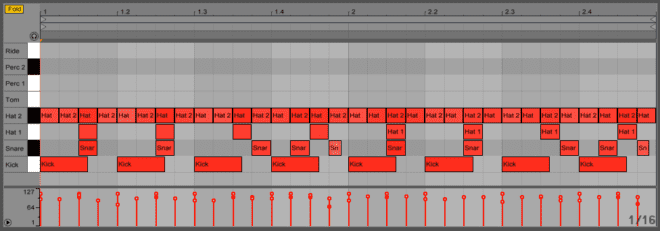
This beat contains two slightly different closed hi-hat sounds. The first, Hat 1, is treated with some saturation and subtle plate reverb and plays on the off beat, mirroring the snare pattern in most places and adding a little complexity toward the end of each bar.
The second, Hat 2, is similar to first but without the use of saturation and reverb. We’ve layered it with some white noise to create a subtle crispy decay tail, helping the 16th-note pattern to breath. We’ve also high-pass filtered it to make it thinner. Velocity play a fundamental role here, making the pattern feel more humanised and adding a subtle groove. Note that we’re not using choke groups on the two hi-hat samples; we want them both to play when they’re triggered simultaneously.
Audio PlayerStep 4
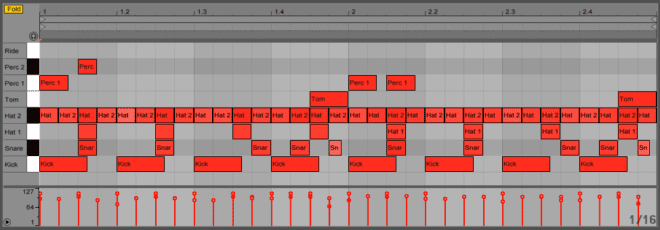
We proceed by adding a tom sound, starting with an 808 sample and then adding a large but short reverb. The sound is then bitcrushed using D16 Decimort after the reverb, so as to process the ambience as well as the original sample. The result is a percussive sound with a gloomy character, carrying some digital artifacts on the high end. The pattern is simple, just triggering on the final off beat of each bar, but this can be varied throughout the track to add some interesting rhythmic effects. The tom hit can sit almost anywhere in the beat, although you may want to filter away some low end if you trigger it on top of a kick drum.
Audio Player
Step 5
Next up is a tuned percussion sound. An analogue rim shot sound such as the one from the Roland TR-909 is a good starting point here, but any percussive sound with a defined pitch can work. We’ve taken two copies of our sample then tuned one low and one high. The exact tuning of the hits should be adjusted to match the key of your track. Next, we’ve added heavy overdrive then filtered with a 24dB/octave high-pass filter. The exact pattern of the tuned percussion will also depend on the other melodic elements of your track, but as a starting point we’ve emphasised the beginning of each bar, leaving space for other tuned elements.
Audio PlayerStep 6
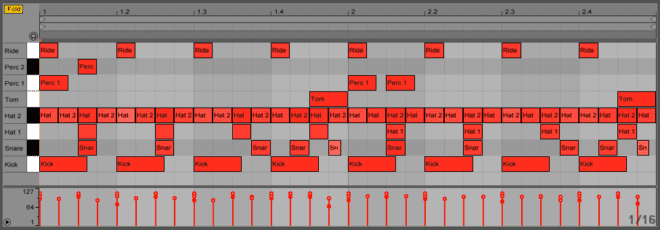
Finally, we add a ride sound, using a TR-909 sample that plays the same pattern as the kick drum, to make the groove more incisive. This is added separately so that it can be muted and varied independently of the kick itself, emphasising parts of the mix. The ride is processed with a small amount of plate reverb and a high-pass filter to ensure it sits in the top of the mix without taking up too much mid-range space.
We haven’t processed the drum bus for our examples, but saturation from an effect such as FabFilter Volcano can be added to achieve a more aggressive character.
Audio Player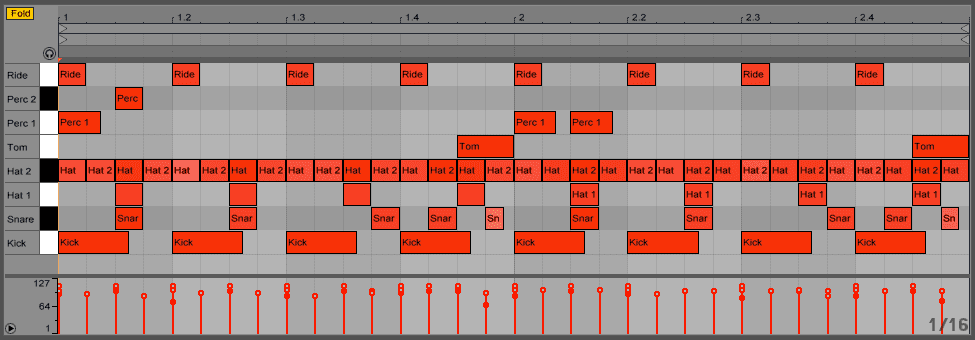
04.00 PM
more of this!
06.27 PM
yesss, more like these please!
08.34 AM
Awesome!
03.34 PM
more
05.18 PM
are you serious?
04.57 PM
NOICE
06.16 PM
we need more detail
10.17 AM
i keep getting lost between step 1 and 2. Could u do it over please?
03.24 PM
@crom is right, I’m totally lost at step 2. I wanted to just add the snares, but then the kicks started to interfere and some muddiness kicked in. Also, I’m using analogue snares with natural kicks. Is it a problem?
My UAD levels are right, I asked dad and he told me to add more gain. Anyways, I hope it’s not a 192Khz issue.
I started composeing the kicks in G maj if that helps. What plugin are us using for snare chords?
11.11 AM
@Bela you have no idea. If you want to make real techno, you have to just do it and not be a pussy worrying about g maj, 192khz, natural kick, analogue snare etc etc bla bla
Get stuck in and use your gut. Following these tutorials to the word like a geek will leave you with lifeless weak music.
Listen to some good thumping techno from the 90’s and I guarantee these guys were just running hardware through a desk often in one take. It is about feel, energy and expression not this bullshit pansy ableton shit
03.05 AM
@mart
lol wut
03.08 AM
Sorry, tocreates ?
Google doesn’t know either.
12.56 PM
Schwar – sorry, typo! Fixed now
11.32 PM
Hey Schwar – tocreates was a greek philosopher – a student of socrates