Sampling strings from existing records is a staple technique in dance production, but it has its downsides. Creating your own custom samples allows you to avoid most of the pitfalls.
Sampling is one of the most important techniques in dance music production, but there are a few major downsides to using samples of existing records in your own tracks.
Firstly, using a sample without permission from the copyright owners can be legally risky to say the least. In these litigious times, there’s little chance you’re going to be able to use it without inviting a shedload of legal repercussions should the owners of the original copyrighted work get to hear it. From a legal standpoint, the rules on sample usage are pretty clear: iIf you use a component of someone else’s recording in your own track, no matter how small, you run the risk of being sued for copyright infringement.
Secondly, working with samples can also be restrictive. An otherwise perfect sample might be out of key with the track you want to use it in, or contain an unwanted drum hit. So what if we could make ‘samples’ from scratch to use in our tracks? By creating bespoke audio parts and then resampling them, we can integrate all of the distinctive sounds of classic sampling techniques with much more versatility and no legal issues to worry about.
In this case, we’re going to create a disco-inspired string sample, based on one of the most classic house and techno production techniques of sampling from old records (similar techniques will also work for synth parts, vocals and drum loops, but strings require a few extra steps).
New For U
To start off with, let’s take a look at an example of a string part that’s been sampled and used in a commercial record. Here’s Andrés’s 2012 track ‘New For U’, which uses a sample of the string part from a 1978 track by Dexter Wansel called ‘Time Is The Teacher’. Here’s the original. The sample used is the short section from 0:25 to 0:31.
And here’s what Andrés did with it – look out for the sample at 0:15, and throughout the rest of the track.
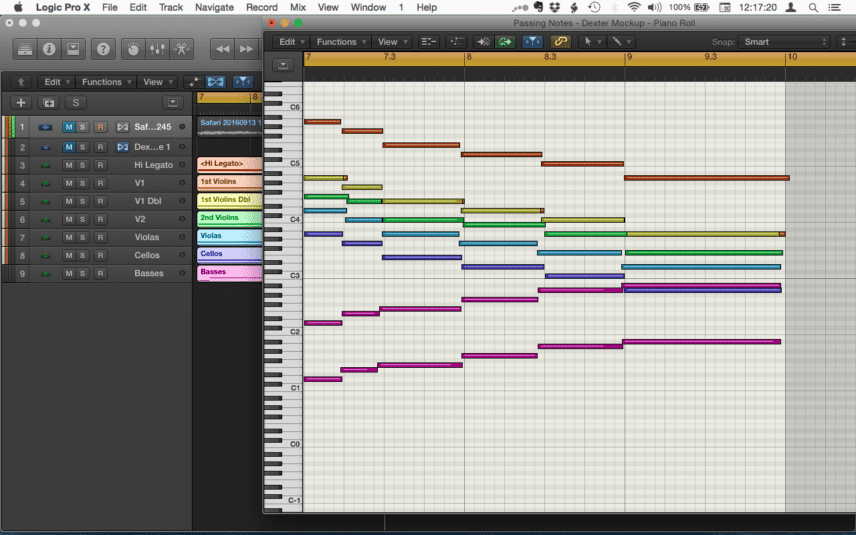
The original sample is in the key of D minor:
Audio PlayerAnd here’s a rough MIDI recreation of it:
Audio Player
The high violins play a descending chord progression of Dm, C, Am, G, F and Dm, while the bass ascends up through D, E, F, G, A and Bb, with that last Bb sitting under a Dm triad, effectively creating a Bbmaj7 chord. The non-diatonic B natural in the G major chord (known as non-diatonic because B natural does not belong in the D minor scale) adds a really nice tense flavour to the progression. The G major is actually diatonic to the key of D major, so this is what’s known as a ‘borrowed’ chord.
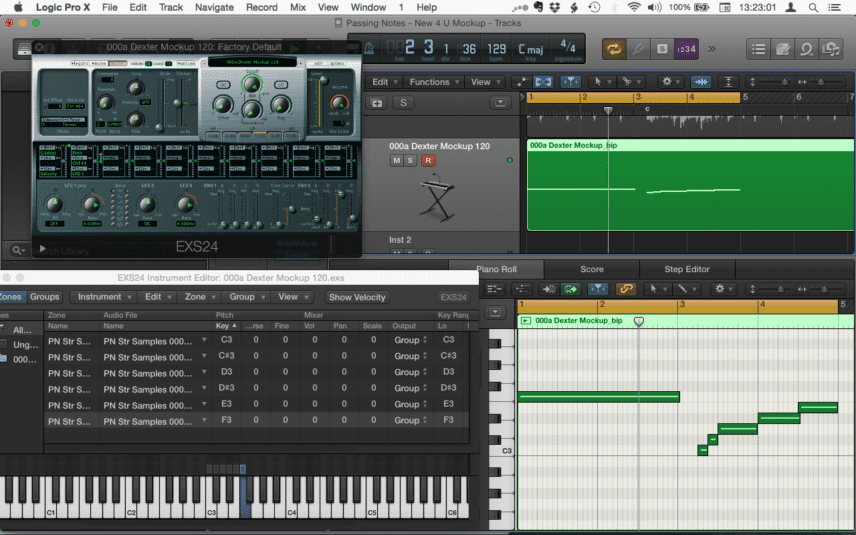
In the Andrés track, the sample has been chopped into chunks and replayed at a higher tempo of 129bpm, in a slightly different rhythm. The first two chords are half their original length, and the phrase comes in on the offbeat rather than the downbeat. The order of the chords has been swapped around so that the long final Bbmaj7 chord is the first chord in the sequence, with the accelerated descending chord pattern following afterwards. This is what the resequenced pattern of trigger notes looks like:
And here’s how it sounds:
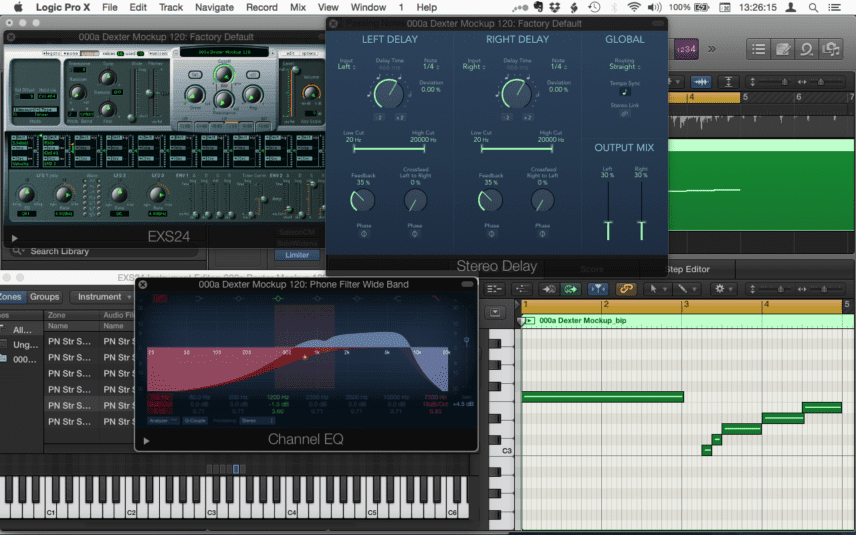
Audio PlayerThe sample has undergone some pretty radical treatment, in the shape of a large dollop of EQ, which cuts off the high and low end and boosts the mids for a filtered sound. This has then been followed by a generous splosh of quarter-note delay to preserve the length of the sampled chunks, accentuate the new rhythm of the replayed chord progression and blur the transitions between the chords. Also, it just sounds cool.
Audio Player
CREATING AUTHENTIC STRINGS
As the above example demonstrates, a great sample can turn out to be the backbone of an entire track. There’s no shortage of potential sound sources to choose from when creating a string part that can then be processed to sound like it came from an old 1970s disco record. For this illustration, we’ve gone with Spitfire Audio’s Albion One sample library, which has just the right combination of realistic sounds and broad-stroke patches to allow you to knock up convincing string parts really quickly.
The first step is to sketch out our string part to get an idea of how it’s going to stitch together musically. This is achieved most quickly by playing block chords with the right hand and bass notes in octaves in the left hand, using a patch that contains long, legato samples – a bit like a conventional string pad on a synth. This way, we’ll quickly end up with the requisite five parts that make up a conventional symphonic band arrangement.
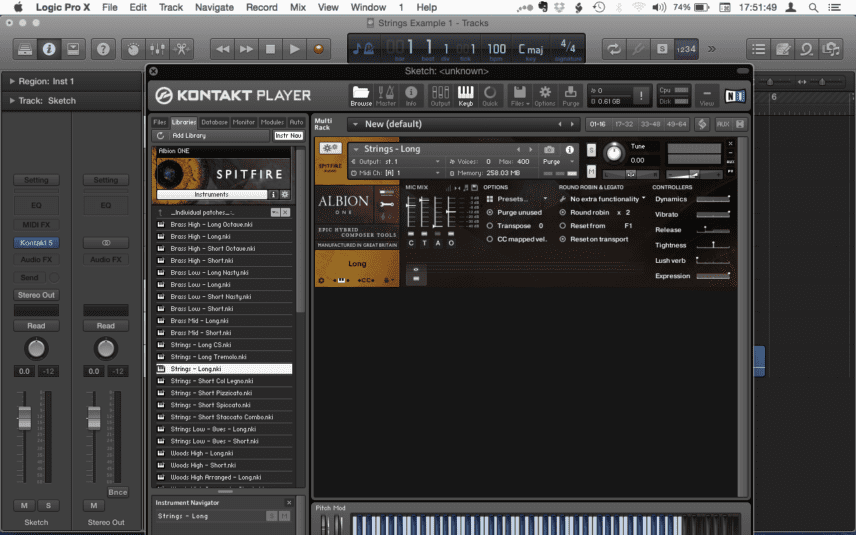
So with this in mind, we’ve loaded an instance of Albion One onto a track in an empty Logic project set at a tempo of 100 bpm and selected the Strings – Long.nki preset. The track we’ll eventually use our home-made sample in will be somewhere in the upper 120s, but the stretched, sped-up quality of the final sample will add quite a bit to the overall authenticity of the sound.
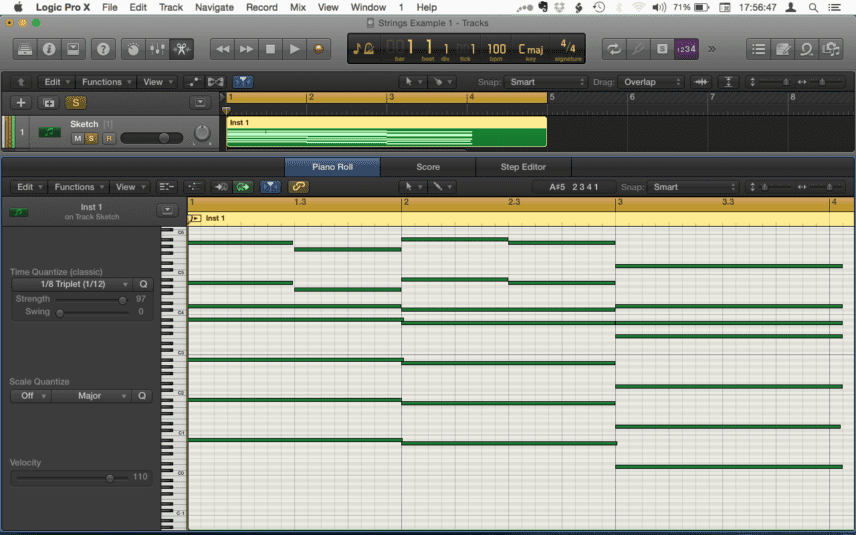
Here we’ve used this sound to program a moody-sounding descending figure over three bars. It’s in the key of D minor, using the chords Bbmaj7 > Bb6 > Aaug > A > Dm. Here’s what it looks like in the piano roll editor:
And here’s how it sounds:
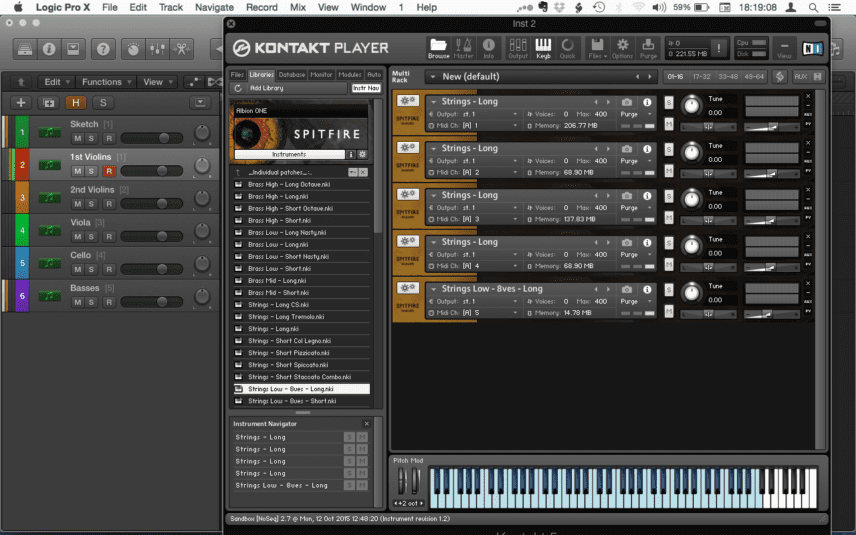
Audio PlayerIt sounds OK in this state, and we could probably get away with using it as it is, but we can easily make the part sound much more realistic. Let’s create some empty tracks so that we can devote one to each of the string parts:
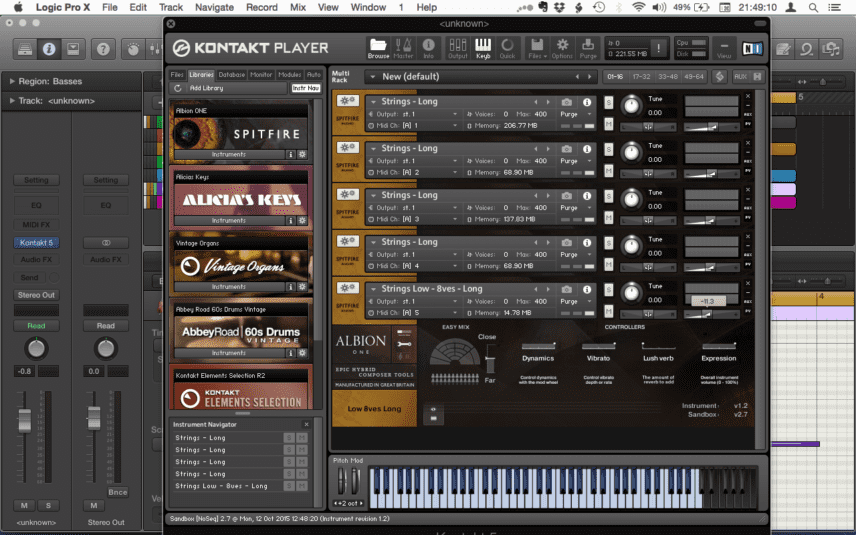
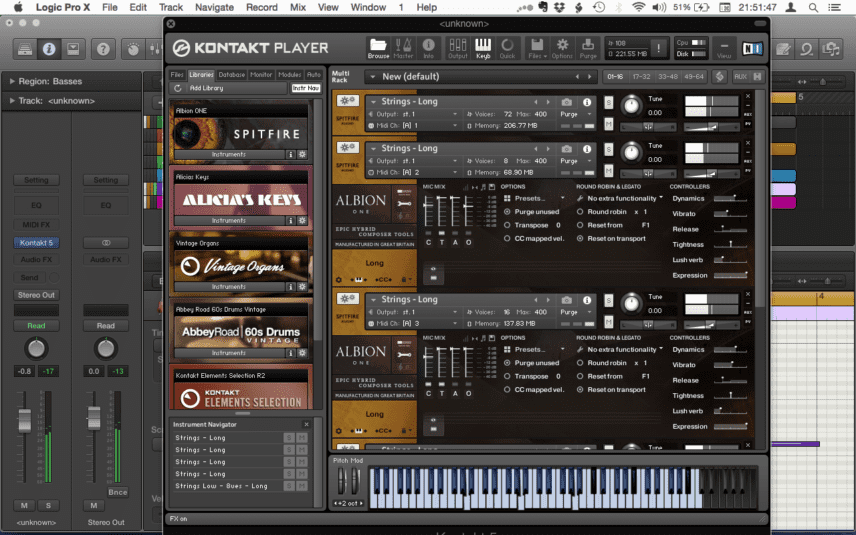
We’ve now got five tracks, each set to channels 1-5 of a multitimbral instance of Kontakt Player. Channels 1-4 each play an individual instance of the Albion strings – Long patch, while channel 5 is set to play the Strings – Low Octaves – Long patch.
The reason we’ve set it up this way is so that we can replay each individual line on its own track and program changes in vibrato and expression using MIDI controller messages. The aim is to get it sounding as if it was played by a bunch of people with instruments, rather than by a computer.
The tracks are labelled starting with the highest parts and progressing down through to the bass parts in the lowest register. So we have:
- 1st Violins (MIDI channel 1)
- 2nd Violins (MIDI channel 2)
- Violas (MIDI channel 3)
- Cellos (MIDI channel 4) and
- Basses (MIDI channel 5)
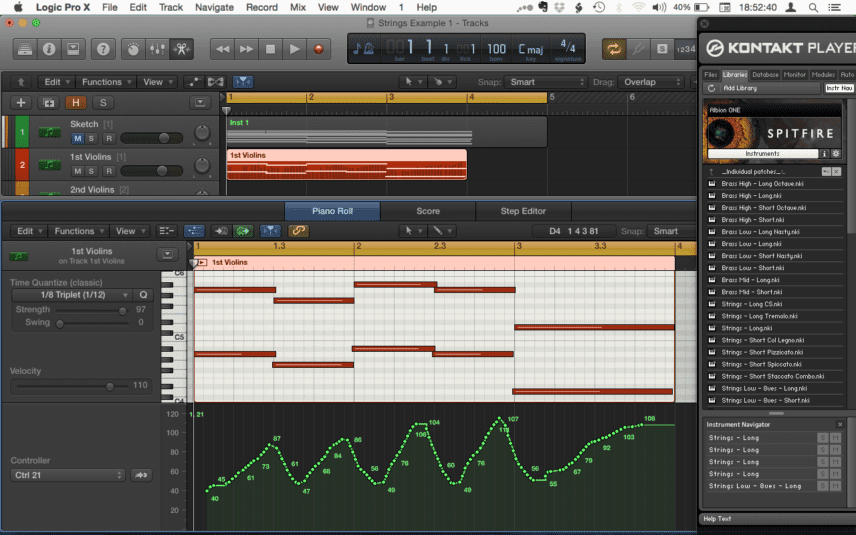
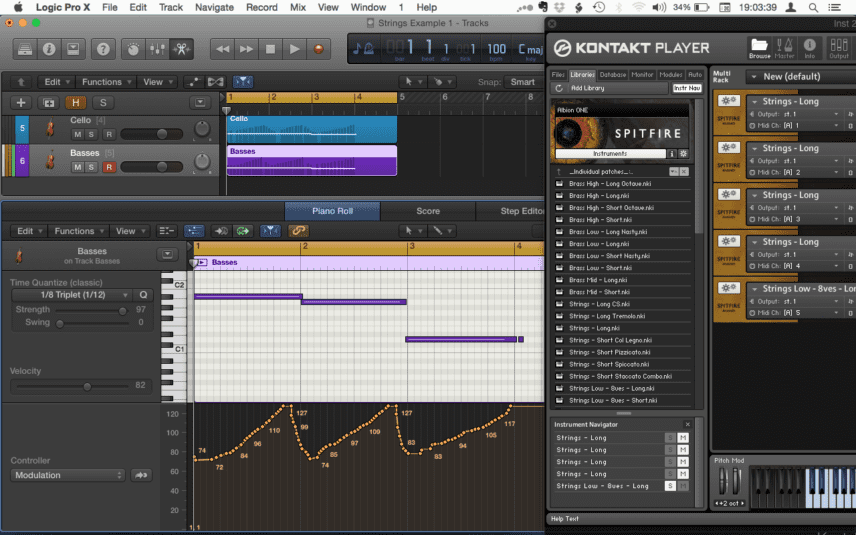
Each of these tracks counts as a single voice within the ensemble, so will mostly be playing single note lines, with the exception of the 1st violins and basses, which will be played in two octaves. Rather than simply copying the existing notes from the sketch pad we recorded earlier, for best results it’s far better to replay each part individually, adding some movement via the mod wheel, which in Albion translates to the Dynamics slider – a sort of volume within the volume control.
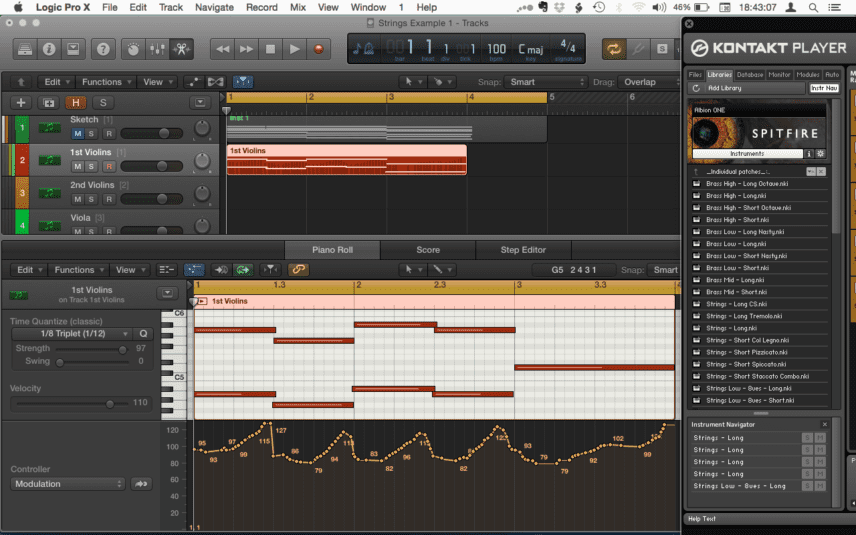
Starting with the mod wheel about two thirds of the way up to give us some headroom to work with, we hit record and play in the first line. The notes are A4, G4, A#4, A4 and D4, with the added higher octave A5, G5, A#5, A5 and D5. Moving the mod wheel to vary the expression throughout each sustained note, we get a curve that looks like this, making each note grow in loudness as it progresses.
And here’s how it sounds:
Audio PlayerOnly use full quantise if your timing is really off, as the notes in each different part will blend together better if the start points aren’t all falling in exactly the same place. It also sounds better if the ends of the notes cross over the start points of the following notes a little, as when string players play legato (smooth) lines, there’s usually very little or no gap between the notes in each line.
Once we’ve got the dynamics, we can overdub some vibrato, so that each note gets wobblier as it goes along, just like it were being played by a real person. We’ve used a fader on a MIDI controller to write this in (faders tend to work better than knobs for this, especially if you need to move more than one at a time).
In Albion One, vibrato depth is controlled by MIDI CC#21. Make sure that your DAW is set to MIDI merge or overdub mode, otherwise you’ll wipe out the existing notes as you record the additional vibrato. Alternatively, you can enable your DAW’s automation curve display and draw a similar shaped curve with your automation tools to get the desired effect.
Audio Player
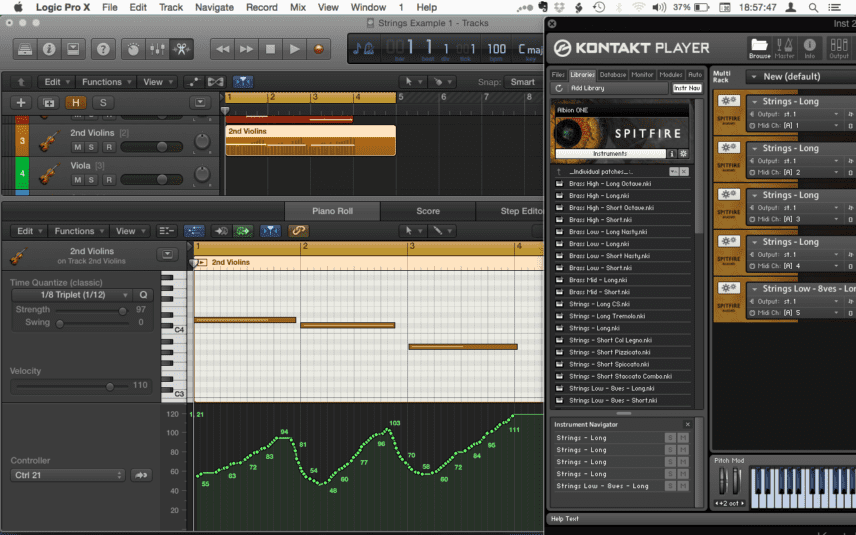
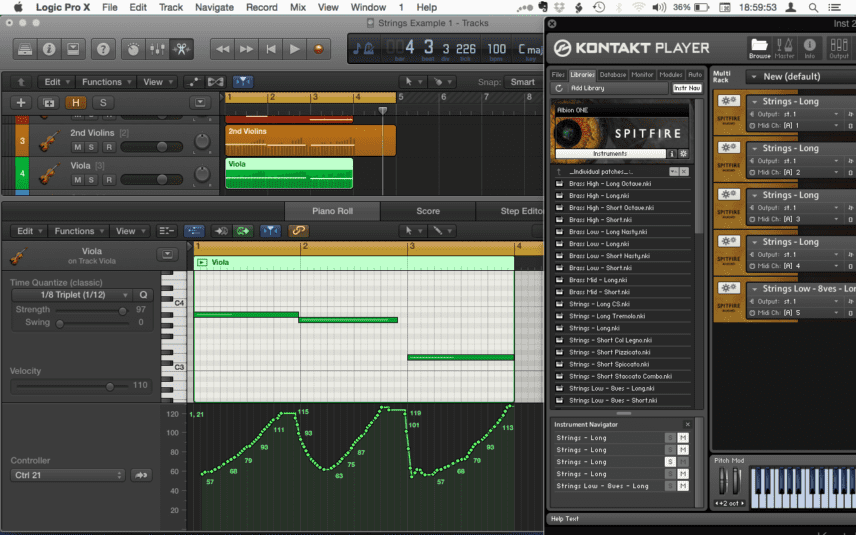
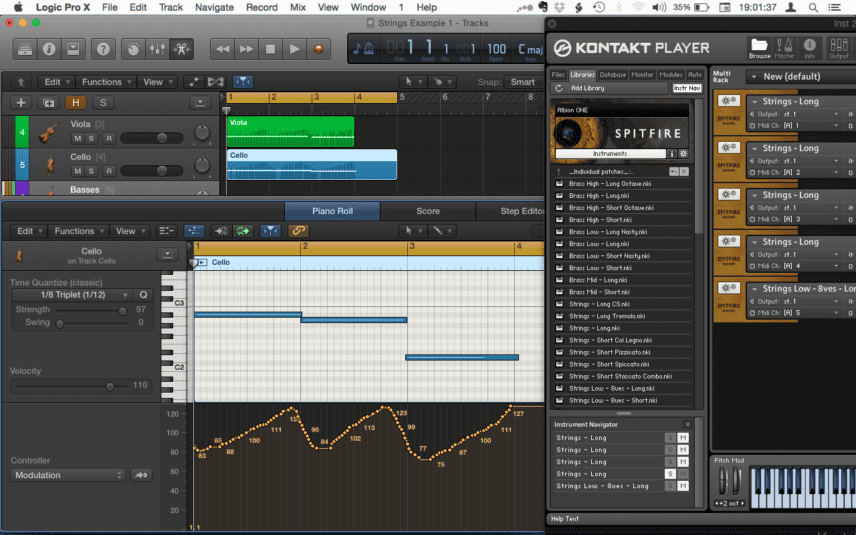
Once we’re happy with the 1st Violins, we can repeat the process all the way down the other four tracks, copying the notes from the sketch pad out onto each part and adding dynamics and expression as we go along. This gives us:
2nd Violins: D4, C#4, A3
Audio Player
Violas: Bb3, A3, F3
Audio Player
Cellos: Bb2, A2, D2
Audio Player
Basses: Bb1, A1, D1
Audio Player
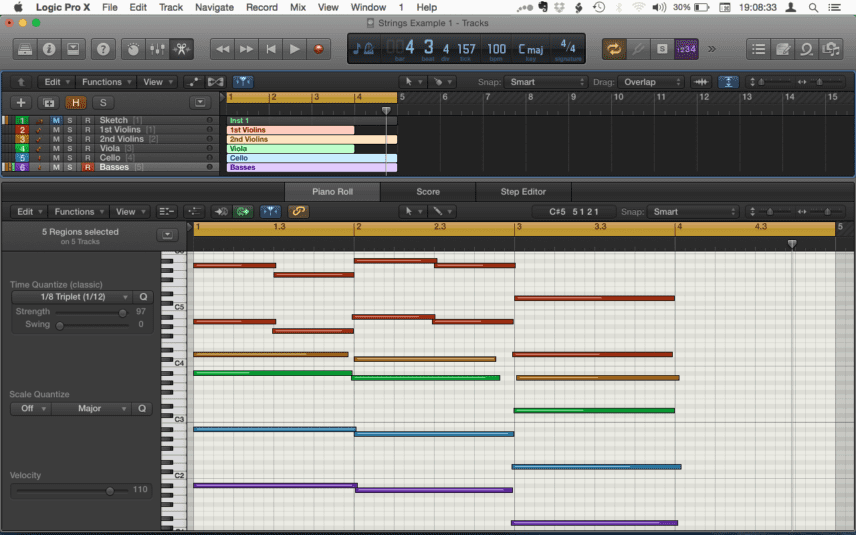
So what we end up with is a full arrangement, with each part on its own track, that looks and sounds like this:
Audio Player
It’s a good idea to colour-code each part – red for 1st violins, blue for cellos, and so on – so that it’s easy to tell which line is playing what when viewing all the parts at once.
ARTICULATIONS
Articulations are just different techniques that can be used when playing orchestral instruments, and they usually relate to the written directions you might find on an orchestral score that tell the players how to play a particular part. For instance, probably the most well-known articulation is pizzicato, meaning plucked strings. Within Albion One’s general Strings patch, you can also choose from spiccato (bouncing the bow off the strings), con sordino (muted), col legno (hitting the strings with the back of the bow) or tremulando (shaky trill between two notes). So, just for added texture, let’s add a spiccato violin line to our sample.
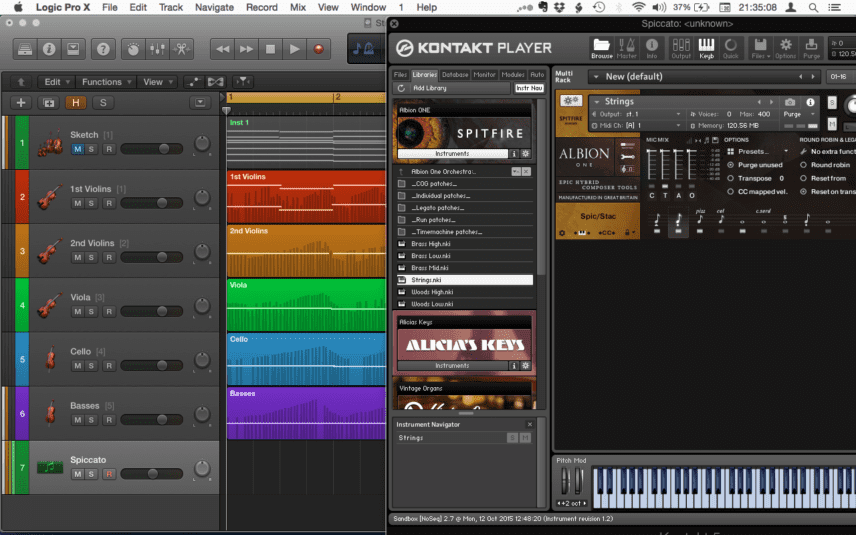
On a new track, we’ll load up an instance of Albion One and select the Strings.nki preset from the Instruments folder, a patch which includes all of the articulations mentioned above, Clicking the symbol second from left in the articulation picker gives us a combination of staccato and spiccato playing.
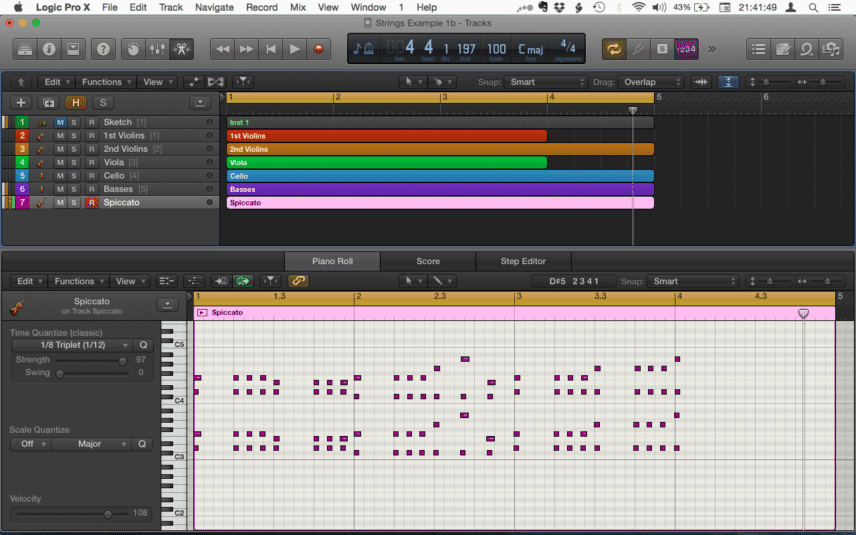
Now we can record in a suitable part – the spiccato setting outputs short notes with hardly any sustain, so a staccato part like the one shown here works best. We’ve programmed it in two octaves, playing a chugging 12/8 rhythm.
Audio Player
This won’t necessarily feature too much in the finished sample, but any extra interest in the arrangement at this stage will only add to the authenticity, making it sound as if our home-brewed sample was lifted from a tune with a totally different feel to the one that the sample will end up in. This is how most samples work, after all!
PROCESSING, MIXING AND BOUNCING
Once we’ve recorded all the parts in, you can blend between them by using the individual main volume controls on each instance of Albion One within the Kontakt Multi you’ve created (a multi is a rack of library instruments all on different MIDI channels, like what we’ve got here). We could do with a little less of the basses, for instance, so we can just pull channel 5’s volume slider down a dB or two.
Audio Player
When mixing string ensemble parts such as these, a great reverb is essential, to glue all the parts together and make it sound as if all the players are in the same room. Albion One has its own internal convolution reverb known as Lush verb, so we apply a little of this to each instance to make everything a little more cohesive-sounding.
Audio Player
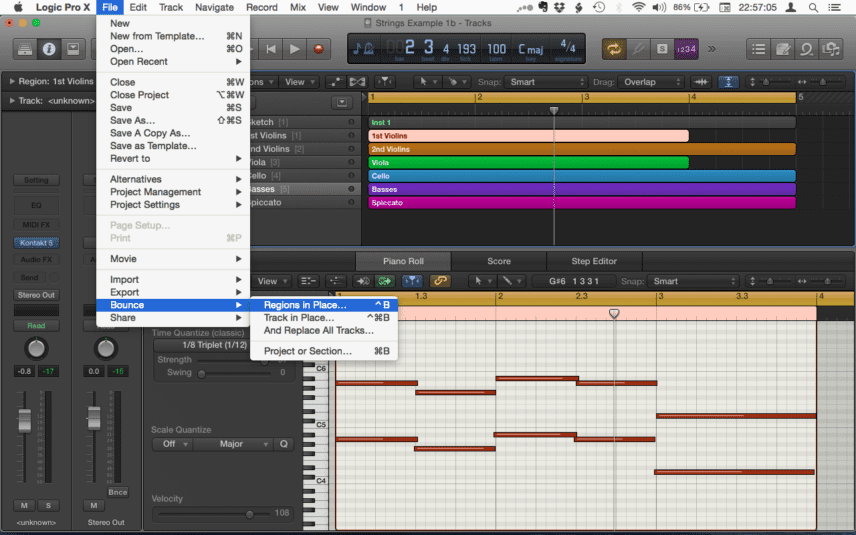
To prepare for bouncing, it’s a good idea to render each individual part as audio first, to take the load off the CPU and avoid any dropouts or crackles due to slow hard disk-reading or low memory issues – we’re still going for a high-fidelity sound at this point, as we’re now at the equivalent stage to where the original string part would actually have been recorded. To do this, use your DAW’s ‘Bounce in Place’ feature if it has one. This bounces whatever regions are selected onto a new track at the same location in the timeline.
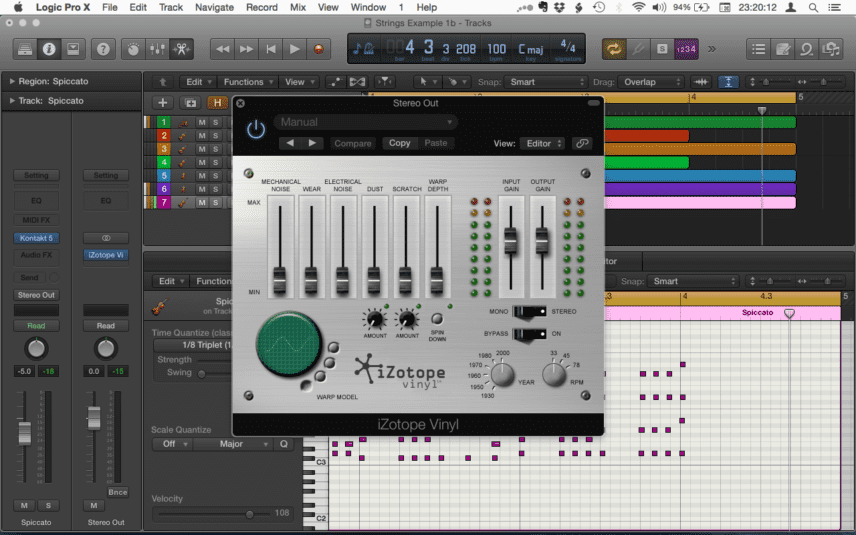
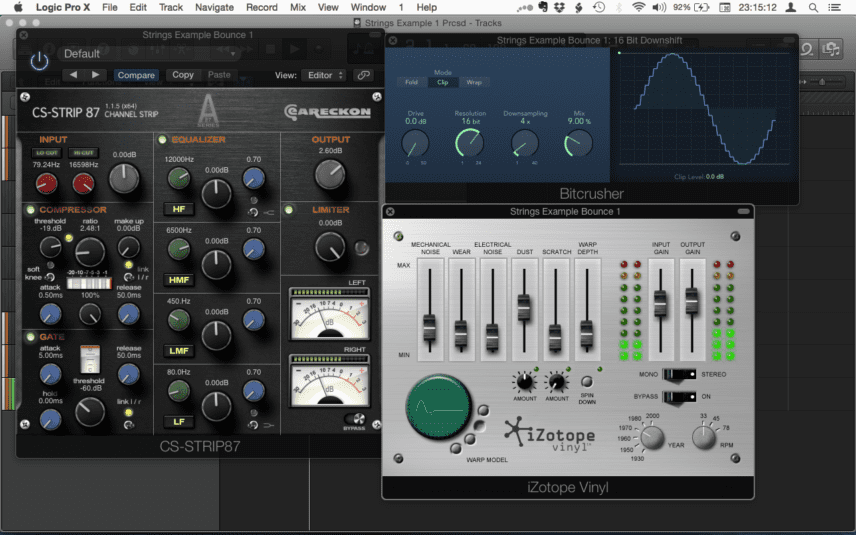
If you have one, a tape simulator plug-in such as Waves J37 Tape would be useful at this stage, to impart the sound of 2” analogue tape to our strings, as that’s how they would have been recorded in our imaginary 1970s recording session. To make our sample sound as if it was authentically sampled from a record, we’re also going to apply iZotope’s brilliant Vinyl plug-in, a venerable crackle-simulator that’s available as a free download.
This will be strapped across our DAW’s stereo output, along with some compression to even out the volume levels and an EQ to take off some of the high frequencies that would have been lost if we’d sampled the strings for real. It also doesn’t hurt to apply a bit-crusher at this point to simulate the bit reduction involved in the sampling process. Here are the settings we’ve used for each of these effects:
Audio Player
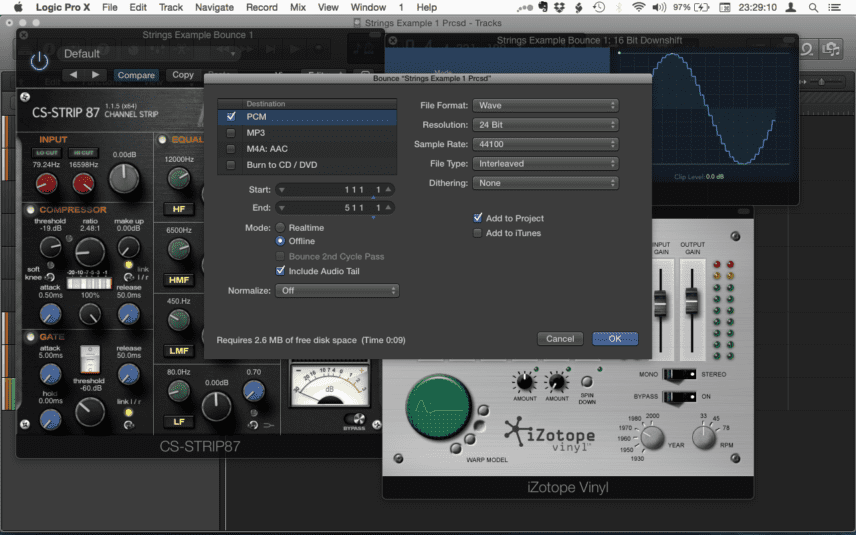
Then it’s finally time to do a final stereo bounce of all the parts to a single WAV file, which can be reimported into a new project, ready to be sampled and manipulated as if it had been lifted from a hidden gem in a dusty crate languishing in a backstreet record store.
Audio Player
RESAMPLING & RECYCLING
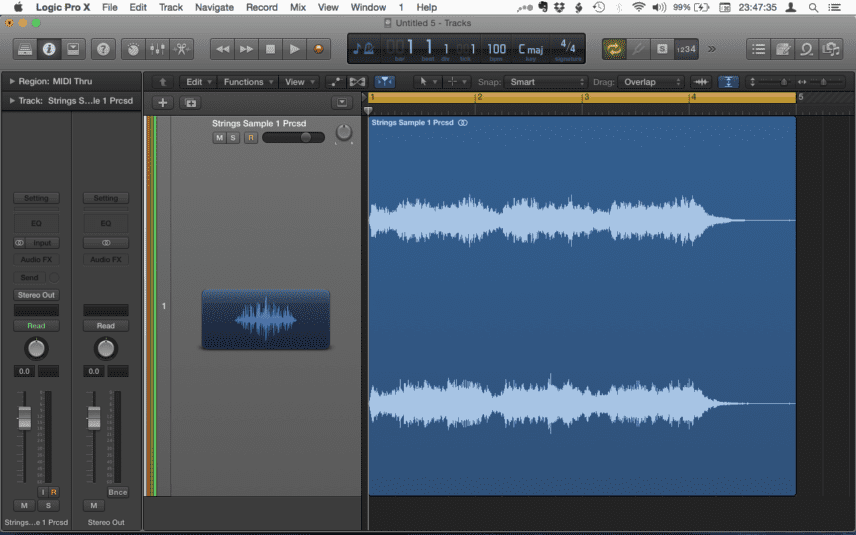
There are, of course, lots of ways to sample a piece of audio. For instance, you can leave it as an audio region in your DAW’s timeline and simply chop it up and rearrange it, or you can import it into a sampler plugin (such as Ableton’s Simpler or Logic’s EXS24), and create multiple zones that each play a different portion of the sample. Here, we’ve started a fresh project at 100bpm and imported the bounced WAV file into it.
Audio Player
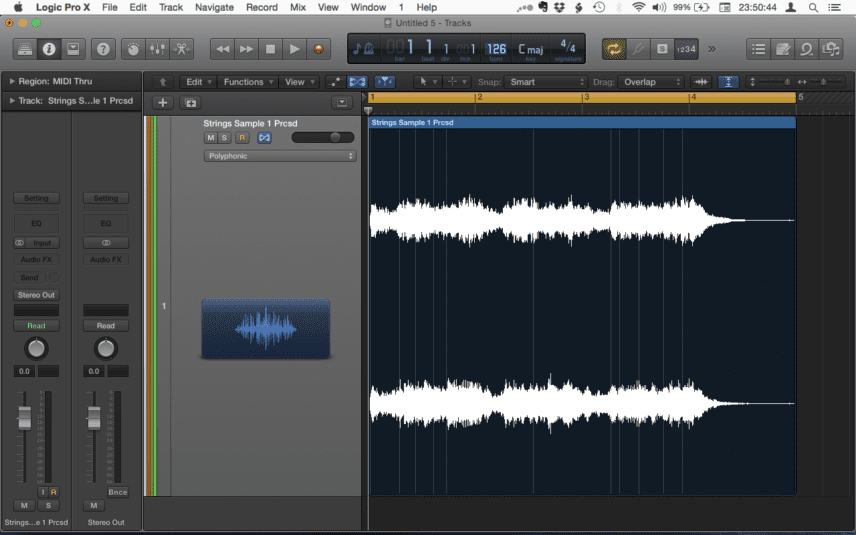
Our next job is to enable Flex time (or your DAW’s equivalent warping/time-stretch feature), then take the project tempo up to the desired tempo of the track we’re going to use it in. This will speed up the sample from its original 100bpm tempo. The sample is already in the correct key – D minor – so we don’t have to transpose it, and this is why we’ve used Flex Time – it speeds up the sample without changing the pitch.
Audio Player
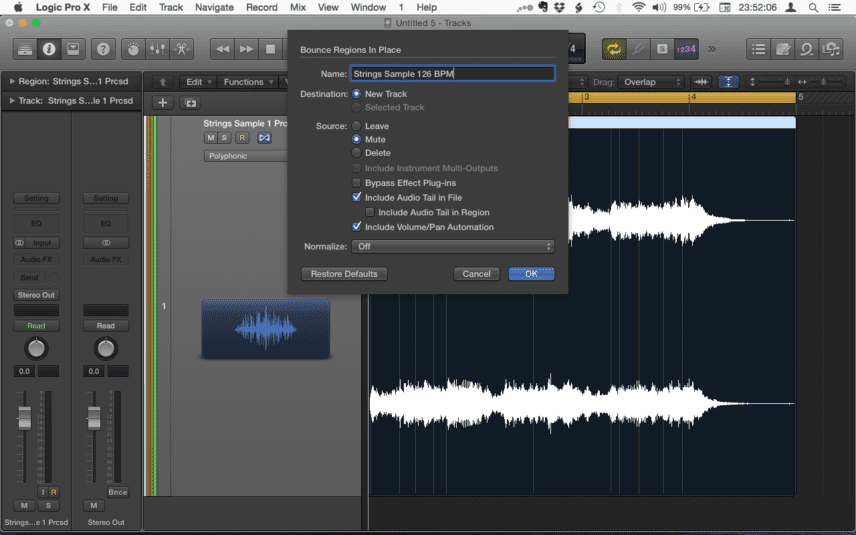
Next, we need to render the sample at this speed so that we can chop up the audio ready for the next step. We use Logic’s ‘Bounce Regions in Place’ feature once again. The result is a new version of the string part at a fixed tempo of 126bpm.
Audio Player
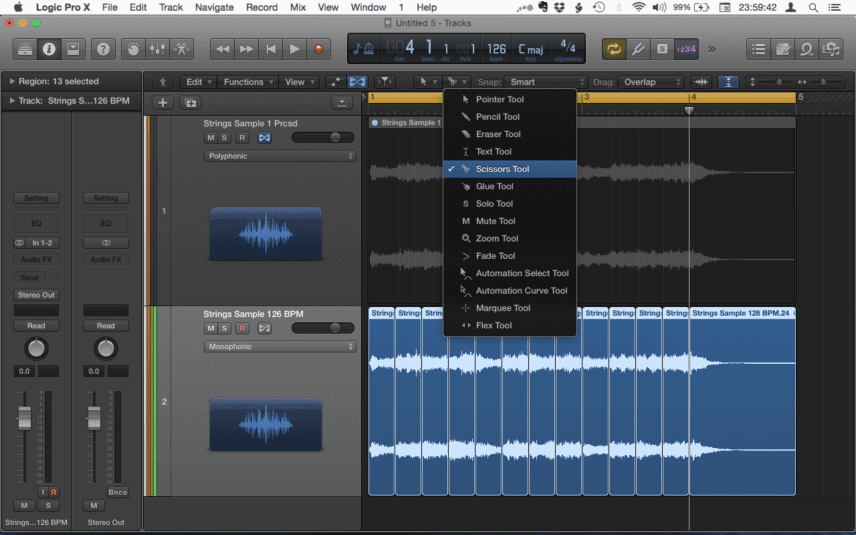
For our replayed sample part, we’ll need to break the sample up into chunks, with one region every quarter-note beat. So, out comes Logic’s scissors tool, and we use it with abandon on our new audio region, ending up with 13 equal-sized regions one beat in length.
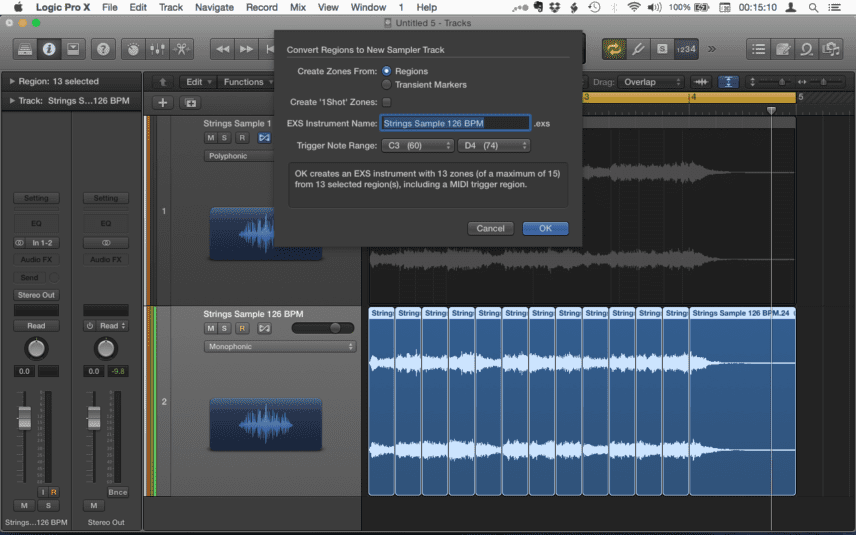
Now to import these regions into a sampler plugin so we can play them from our MIDI keyboard. Logic has a quick way of doing this – the ‘Convert Regions to New Sampler Track’ option. This takes the selected regions and turns them into a new EXS24 sampler instrument, while simultaneously creating a MIDI region that triggers the new samples in their original order – all in one click. We use the settings shown to make sure that it uses the region boundaries from the previous step to define the start and end points of each sample.
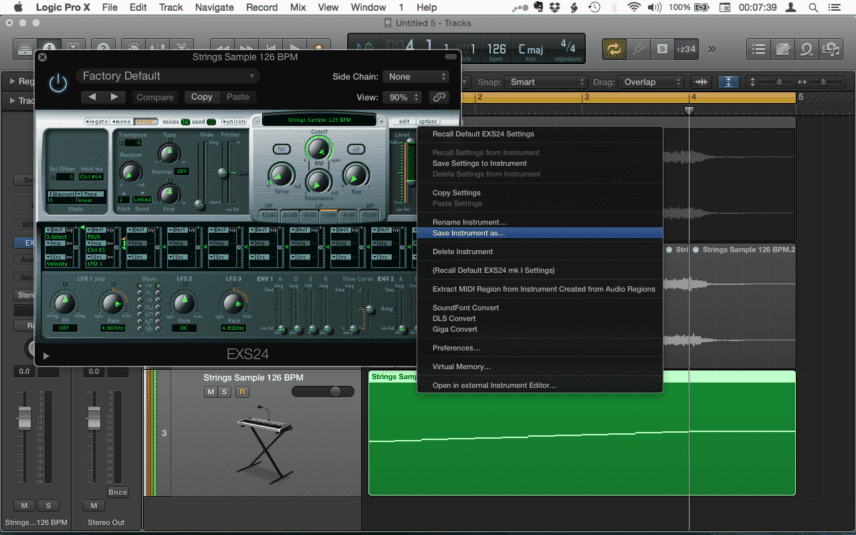
With that done, we can save the new sampler instrument to Logic’s EXS24 library, to use in our next project.
REUSING
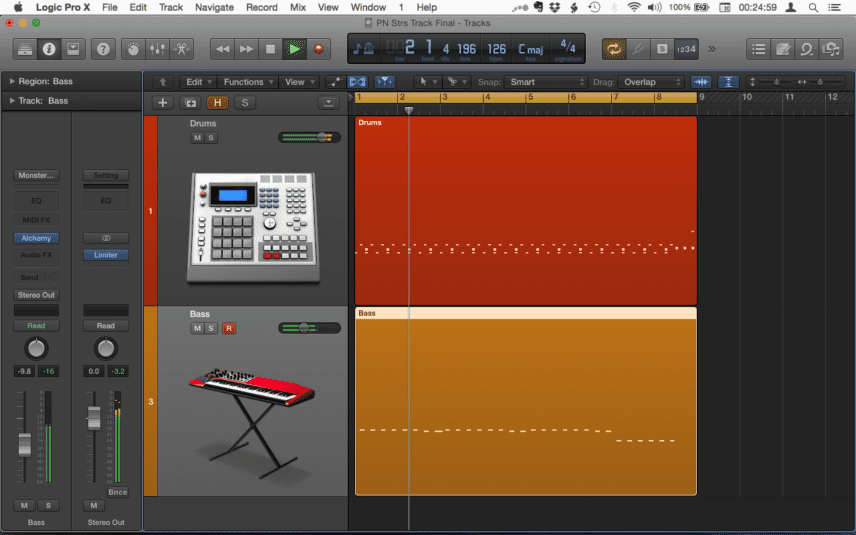
Here’s a project at 126bpm containing a drum loop and a bass part that we want to use our newly-created sample in.
Audio Player
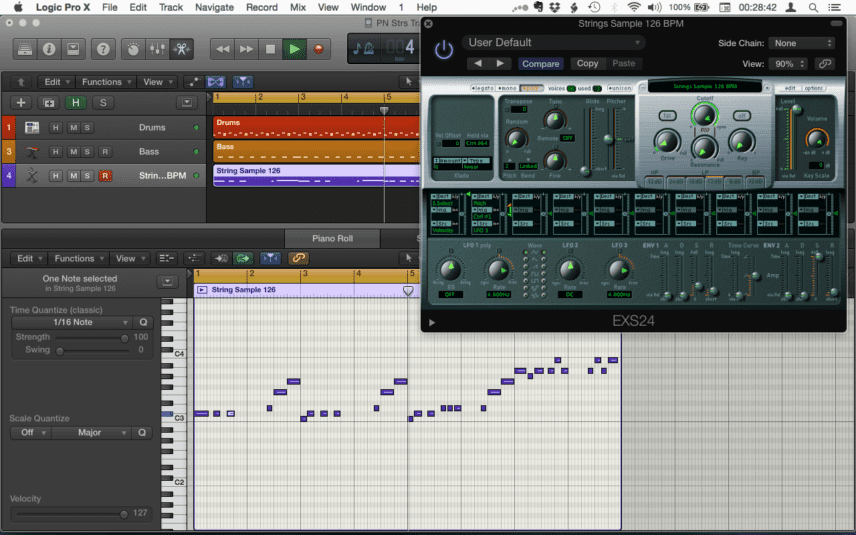
On a new software instrument track, we load up an instance of EXS24 containing our newly-created instrument. Now that each one-beat chunk of the sample is on its own MIDI note, we’re free to rearrange it however we like, so let’s do something like this:
Audio Player
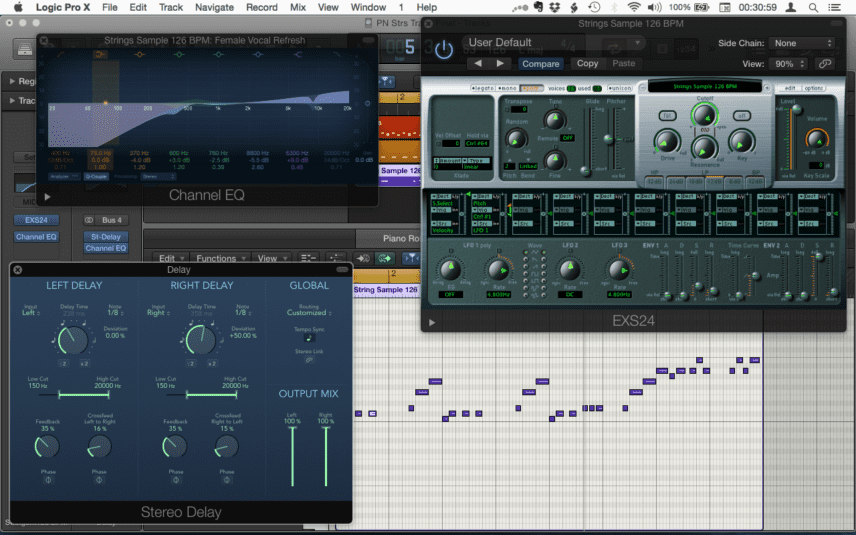
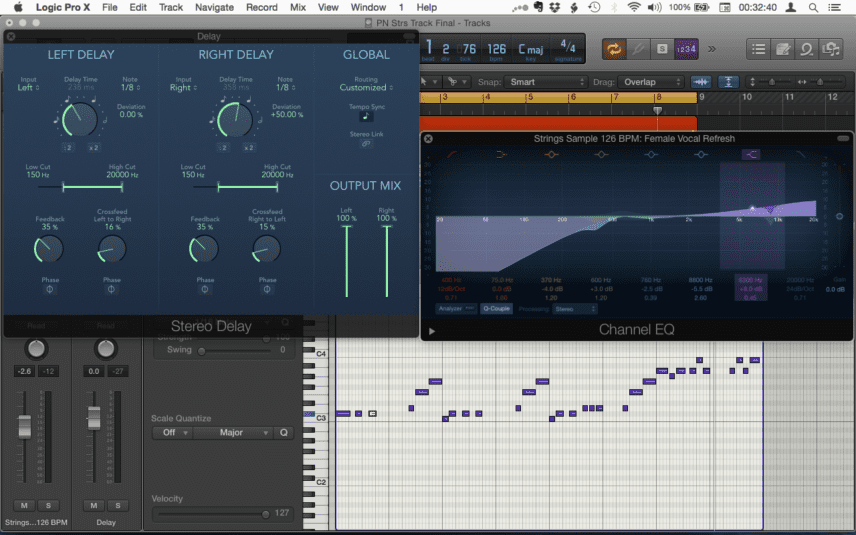
Lastly, a splash of EQ and delay to finish things off, to make the sample sound more at home in this kind of track:
Audio Player
We’ve removed quite a lot of the bottom end here, below around 400Hz, to make more room for the actual bass part – and made the top end more airy. This, in addition to the delay (eighth-note on the left, dotted eighth-note on the right) gives the sound a more contemporary feel, together with the staccato playing of the new sequence, but it’s all a matter of taste. The main thing is, we can use this sample however we like without fear of repercussions from the copyright police.
Audio Player
Further techniques
As a final note, it’s worth pointing out another potential use of this technique. Copyright comprises two parts for each sample – one for the copyright in the actual recording, owned by the record company that released the original track, and one for the copyright in the song, owned by the writer or publisher of the song in question.
If it turns out that the publisher is in favour of you using a particular sample, but the record company either wants too much money or refuses permission altogether, then one way forward is to recreate a sample by programming it yourself within the confines of your DAW as shown here and using that in your track.
Although this option might seem like a bit of a compromise, it will at least ensure that you don’t end up getting sued. You’ll still be liable for publishing royalties for use of the original composition, but at least you’ll escape having to fork out a payment to the record company for use of the original recording. As a bonus, you’ll end up with the part in question isolated from any other instruments that may be playing on the recording at the same point, like bass or drums for example.
05.17 PM
brilliant
04.08 AM
Great example guys!