u-he are makers of award-winning software synthesisers and effects including Diva, Repro-1, Zebra2, Hive, Bazille, Presswerk and Satin.
Visit U-he

u-he are makers of award-winning software synthesisers and effects including Diva, Repro-1, Zebra2, Hive, Bazille, Presswerk and Satin.
Visit U-heSynth Secrets is a series of programming tutorials in which we show how to make a range of classic and new synth sounds using plugins such as Massive, Sylenth and Diva.
We’ve covered the basics of arpeggios in previous Attack articles, but there are lots of ways to use similar techniques in tracks. U-he’s Repro-1 plugin features a powerful arp/step sequencer section which can create unique effects.
In this instalment of Synth Secrets we’ll be creating this infinite arpeggio sound:
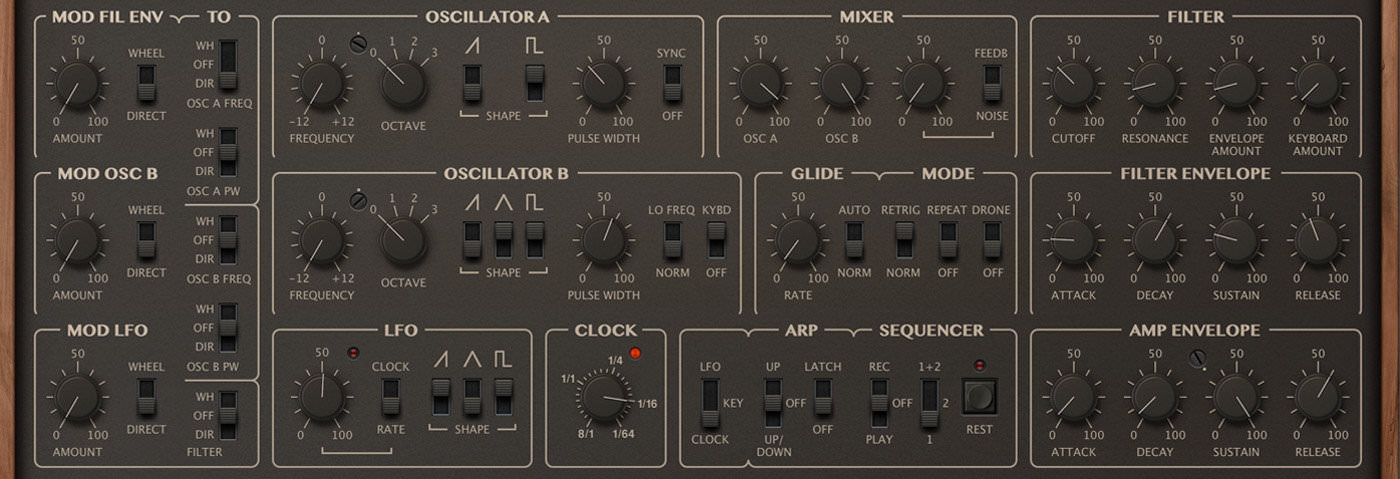
The synth’s mixer section is where we want to start. From here we can control the balance between the two main oscillators. Lets make oscillator A dominant, B a little quieter and add the white noise waveform. We’re also going to record a long note for four bars just so that we can hear the changes we’re making without having to constantly trigger notes via a keyboard.
Audio PlayerWe’re going to leave oscillator A on its default setting but tune oscillator B up 7 semitones so that we have a 5th chord when playing the single note.
Audio PlayerLocate where the filter section is (you’ll see why in a moment) and then go to the top left-hand side of the synth and select Tweaks.
From this menu we will be able to dive into adjustable parameters on the hidden circuit board-style view. Change the filter from Crispy to Driven.
The change will be minor, but will become more apparent when we automate the filter later on. Go back to the top left-hand side and select Synth again. Turn the filter cutoff dial anti-clockwise so that we can filter out some of the high frequencies. At the same time, turn the envelope amount dial to 50.
Audio PlayerFrom the filter, move downwards towards the filter and amp envelope sections. We’re going to shape both envelopes here so that the arp sequencer plays back snappily and accentuates the high frequencies briefly due to the filter envelope’s fast attack.
Audio PlayerTo get the arp and sequencer to trigger we need to set up their sections as below. The 1+2 setting in the sequencer section determines the patterns which will be played. The clock speed setting will also determine the tempo of the synced arp.
Audio PlayerOpen the sequencer section of the synth from the top left-hand menu.
Change the number of steps to 16.
Our melody looks like this. We love using step sequencers like this as they’re so easy to experiment with. Input changes in semitones via the Note row.
Before moving onto pattern two, let’s add some slides/ties so that some of the notes play legato. We can determine whether or not a note is legato by clicking twice on the Type box until the curve symbol appears.
We’re going to copy pattern 1 to pattern 2 so that we can have a 32-step pattern and then make simple changes for the sake of variation.
On the bottom right-hand corner click where it says ‘none’ for preset 1 and then select copy. Then click on ‘none’ in the preset 2 slow below and click paste.
You’ll notice in the sequencer that pattern 1 copies down to pattern 2. We’ve made some changes in notes and ties here to keep the listener interested.
We’ve also moved the root note at the beginning of the sequence for both pattern 1 and 2 because it felt more musical.
Audio PlayerRepro-1 has a selection of incredible effects. Check out the options in the bottom left-hand corner.
Let’s start with the Jaws wavefolder, which is a sort of frequency modulation distortion that takes the synth sound and then folds the waveform back on itself. You can add some really magical width with the bias control (make sure you also have B-mod turned on).
Audio PlayerNext up is Lyre. This is an analogue-style bucket brigade-type delay. Try out the different flavours by clicking on Clean and selecting from the drop-down menu.
Audio PlayerRes-Q is early EQ, designed to bring out the beauty from your sound. It can be as subtle or wild as you like.
Audio PlayerLast but not least is Drench, a suitable name for a reverb. Try automating this alongside the filter cutoff for tension-building moments to keep the listener on their toes.
To show you how we’ve automated our synth, we spent a bit of time adjusting the sound to sit perfectly with our drums and bassline. We’ve automated the cutoff and reverb to help build up the energy of the track and fill out the space just before the drop.
Audio PlayerNotice how much movement we’re getting from this arpeggiated sequence that will surely be able to hold the interest of the listener throughout the whole track.
29th March, 2018

u-he are makers of award-winning software synthesisers and effects including Diva, Repro-1, Zebra2, Hive, Bazille, Presswerk and Satin.
Download the demos and try them for yourself at www.u-he.com
Attack Magazine is funded by advertising revenue. To help support our original content, please consider whitelisting Attack in your ad blocker software.
x