u-he are makers of award-winning software synthesisers and effects including Diva, Repro-1, Zebra2, Hive, Bazille, Presswerk and Satin.
Visit U-he

u-he are makers of award-winning software synthesisers and effects including Diva, Repro-1, Zebra2, Hive, Bazille, Presswerk and Satin.
Visit U-heIn this Synth Secrets, we create a Mall Grab-inspired layered pluck lead that emulates his fast-paced, rave-ready style.
Synth Secrets is a series of programming tutorials in which we show how to make a range of classic and new synth sounds using plugins such as Massive, Sylenth and Diva.
This time, we’re going create a layered pluck lead inspired by Mall Grab’s tune, ‘Switchblade’, released earlier this year. The track is one of four on the Australian-born producer’s latest EP Sunflower, which he has described as an introduction to the debut Mall Grab album scheduled for a late 2020 release.
To mimic his style, we will use Kilohearts’ Phase Plant synth. This versatile piece of software offers a wide array of options for plucky transient layers and waveforms, making it a good choice for processing layered parts. You can, however, use any synthesizer or sampler you have to repeat the process.
Here is the lead part we will be creating with a beat for context:
We opted to use a different type of beat in contrast to the original’s breakbeat style to emphasize how this type of lead can be used across different genres. Remember, you can click on any image to see a larger version.
Set your project BPM to 139, create an empty MIDI channel and program in the below MIDI pattern.
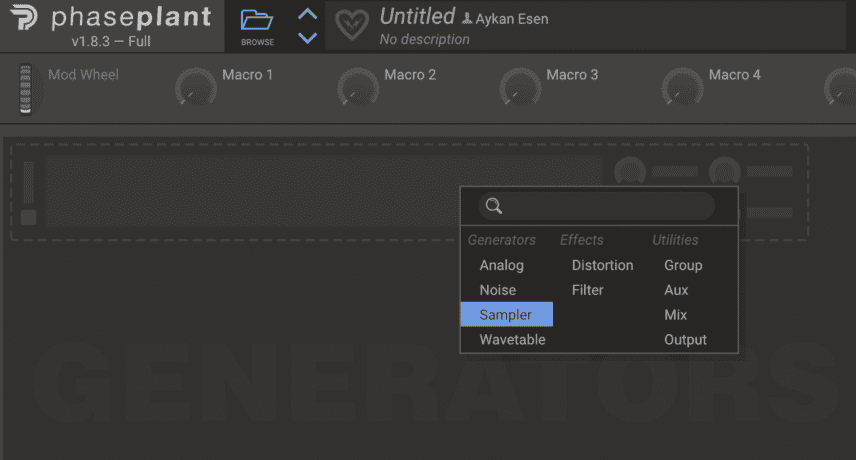
Insert an instance of Phase Plant and click on the Generators section to add a Sampler. This should automatically bring up an Output envelope, which is the amp envelope.
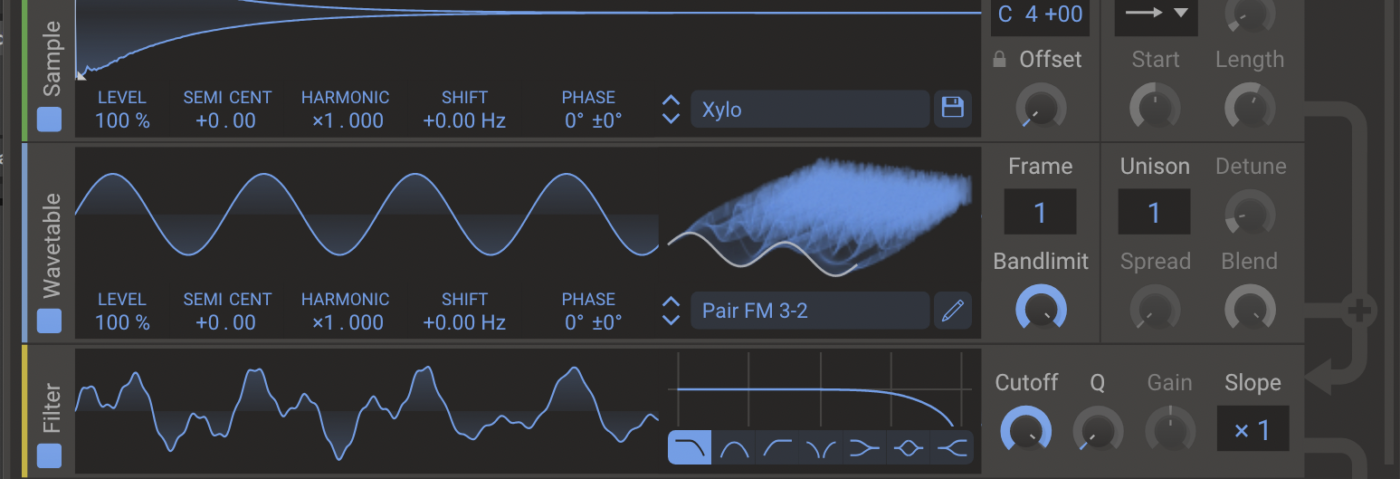
In the sample library select Xylo in the Transients folder. The sounds in this folder make for great plucky layers so feel free to experiment with your own combinations!
Click on the Generators section once more to add a filter. This will place the filter after the Output envelope. Click and drag the filter to above the output so that it affects the signal. Bring the cutoff down very slightly to around 18kHz. This is only to prevent harshness in the top frequency band.

Next, let’s add a wavetable layer to make it a little more interesting. Click on the Generators section to add a wavetable and select Pair FM 3-2 from the FM folder.
Drag the wavetable oscillator above the filter so its part of the same group as the Xylo sample layer. It’s this layering that gives the sound a distinctive characteristic—the acoustic familiarity of the xylophone versus the more synthetic wavetable.
Lastly, set the Output envelope’s attack time to around 4-5ms. This is to bring down the initial transient of the pluck, which can sound harsh when run through reverb.
Our progress so far:
It sounds good but let’s add some effects to really bring our pluck alive. The default signal flow is from Lane 1 through to Lane 3, and then the output. This is perfect for what we need. In Lane 1, insert the Reverb snap-in and set the Decay to around 3.7s, the Mix to 14% and the Size to 83%. We’re almost there.
Finally, our pluck could use some stereo imaging. Insert the Haas snap-in to add stereo width and then add the Compressor snap-in after to nicely round off the pluck transients. Turn the Threshold down to around -20db and increase the Makeup to about 30% to compensate for the gain reduction. And we’re finished.
The sound with reverb:
The final result with added stereo width and compression:
Here is the lead part with a beat for context:
Author Aykan Esen
25th August, 2020

u-he are makers of award-winning software synthesisers and effects including Diva, Repro-1, Zebra2, Hive, Bazille, Presswerk and Satin.
Download the demos and try them for yourself at www.u-he.com