
u-he are makers of award-winning software synthesisers and effects including Diva, Repro-1, Zebra2, Hive, Bazille, Presswerk and Satin.
Visit U-he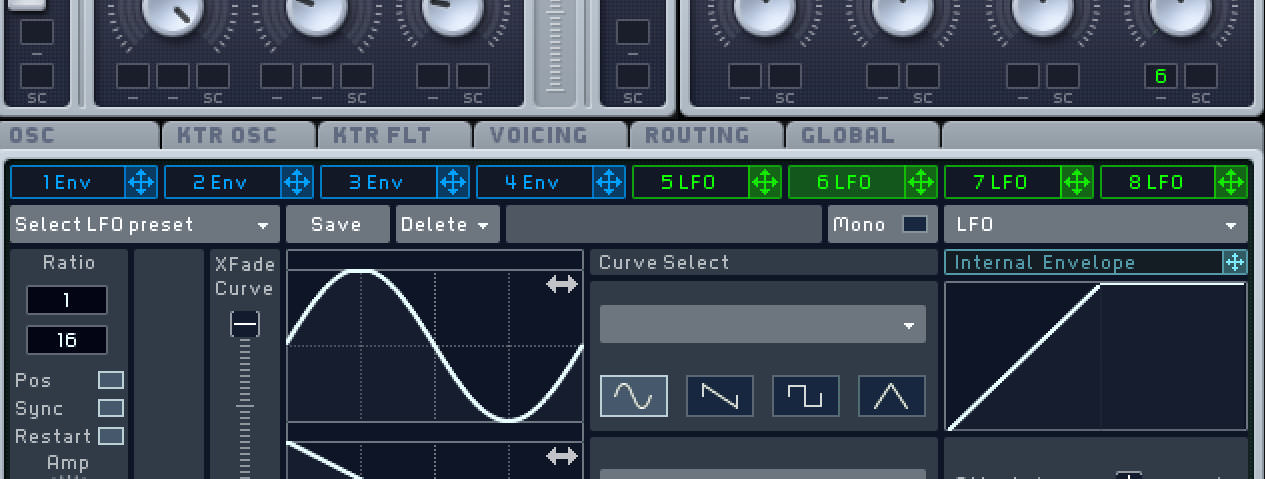

u-he are makers of award-winning software synthesisers and effects including Diva, Repro-1, Zebra2, Hive, Bazille, Presswerk and Satin.
Visit U-heSynth Secrets is a series of programming tutorials in which we show how to make a range of classic and new synth sounds using plugins such as Massive, Sylenth and Predator.
In this Synth Secrets we’ll be making a twisted Neuro bass using NI’s Massive. Here’s an audio example of the sound we’ll be making:
Audio PlayerAnd here’s a screenshot of the MIDI used to create the hook. Note the pitch bend in the third bar and also how some of the notes overlap:
Load Massive and initialise a preset by selecting New Sound from the plugin’s File menu
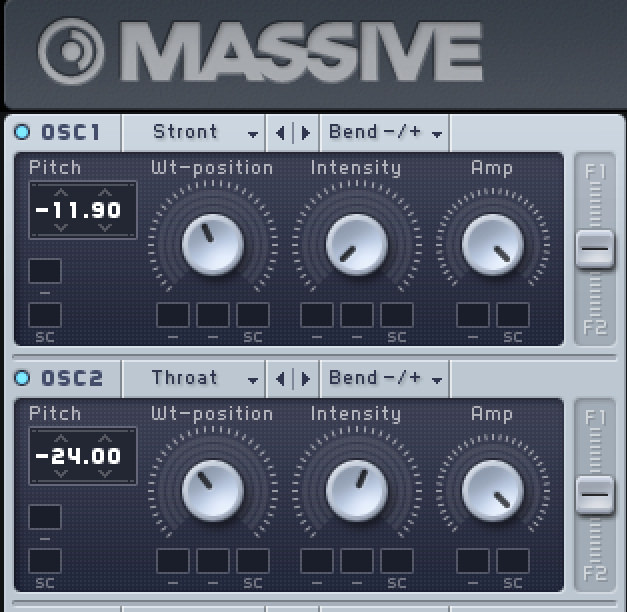
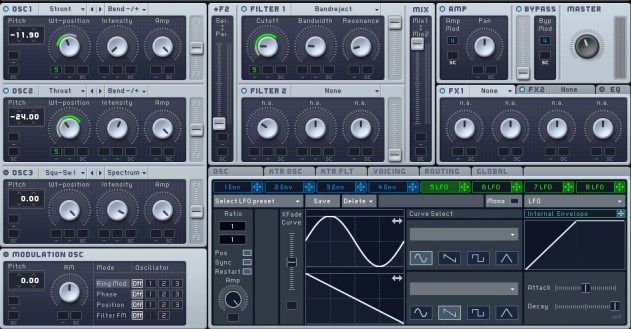
In Osc1 select the Strontium wavetable from the Analog/Electric column and reduce its pitch to -11.90 (having the pitch offset slightly creates the detuning effect). Next, turn the wavetable position dial (Wt-position) to around 45%, change the mode of the intensity control from Spectrum to Bend -/+, and reduce Intensity to 0. (The Bend -/+ mode squashes and stretches waveforms, which helps create the aggressive metallic tones that Massive is so good at.)
Switch on Osc2 and select the Dirty Throat wavetable from the Analog/Electric column. Lower its pitch two octaves to -24.00, set the wavetable position to 40%, change the Intensity mode to Bend -/+ again, and reduce Intensity to just over 50%.
Audio Player
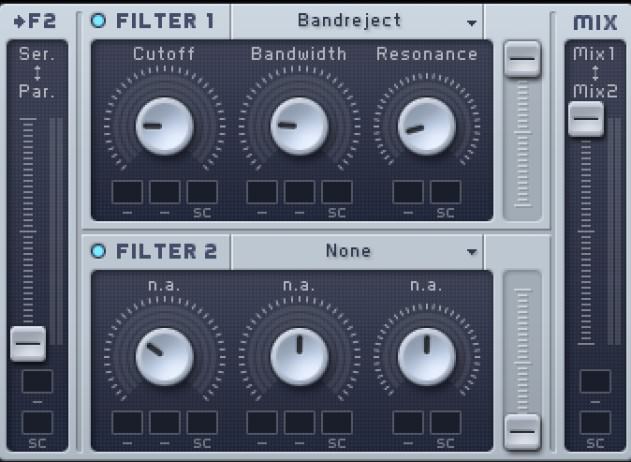
A big part of the neuro sound comes from the use of a band reject filter. Band reject filters act in the opposite way to a band pass filter – filtering out a set of frequencies from the sound. When using the band reject filter in Massive, the rejected frequency band is determined by the cutoff control while the width cut is set using the bandwidth control.
Move to Filter 1, select Bandreject from the drop-down menu then reduce Cutoff and Bandwidth to around 25% for a fairly narrow band. Set the Resonance to around 10%. The filter Mix slider needs to be pushed to the top so only the output of Filter 1 is audible.
Audio Player
Click the Voicing tab on the synth’s central panel to set up how Massive responds to the programmed MIDI sequence.
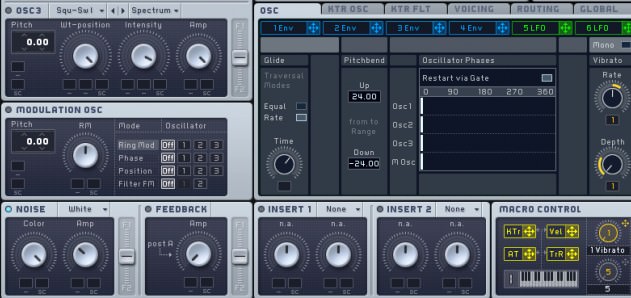
Check the box next to Monophon to make the synth monophonic rather than polyphonic, then in the Trigger panel below check Legato. These two actions mean that only one note will play at a time and that portamento/glide will be applied when MIDI notes overlap.
Now click the Oscillator tab, turn the Glide Time dial (bottom left) up to 66% and check the Restart via Gate box in the central panel to ensure the oscillator phases retrigger for a consistent tone. In the Pitchbend box, amend the Up value to 24.00 and Down to -24.00. This ensures that any pitch bend applied will have far more impact.
Finally, add a little white noise for dirt and top-end sizzle. The Noise oscillator (bottom left) is on by default. Increase the Amp control to around 33% to add it to the oscillator mix.
Audio Player
Time to add modulation to get the trademark movement into the sound. Navigate to the first LFO slot (the 5LFO tab on the central panel). Now click and drag the green crosshair to the first (left) box below Osc1’s Wt-Position dial. Do the same for Oscillator 2. A green number 5 should now be showing on the left slot beneath the Wt-position dial on both oscillators.
Click and drag down on the green 5 below Osc1’s Wt-position dial then. You will see a green and grey bar extend around the outside of the Wt-Position dial. Keep dragging until the bar covers around 33% of the dial. Then do the same for the Wt-Position control on Osc2, but this time click and drag up to apply the modulation in the opposite direction. You should now hear modulation on the sound when you play a note.
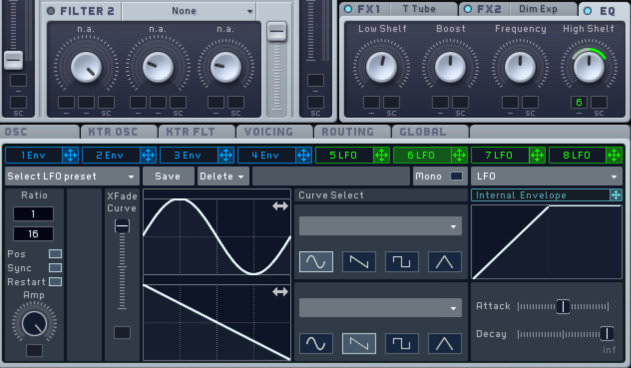
Return to the 5LFO panel and check the box next to Sync to sync the speed to the host tempo, then change the ratio to 1/1, setting the cycle to once every bar.
To add further movement, apply the same 5LFO modulation to the Cutoff frequency of Filter 1 – clicking and dragging up on the modulation box until the green bar goes half way round the Cutoff dial.
The result is a complex, evolving tone in which the filter modulation delivers a shifting tonality while the Wt-position modulation means both oscillators are constantly shifting between different waveforms.
Audio Player
Now for some effects. To add grit, dirt and character select the Tele Tube distortion effect in the FX1 slot. Set Dry/Wet at 60% and Drive at 90%.
In FX2 select the Dimension Expander. Reduce Size to 0 to cut down unwanted stereo movement and set Dry/Wet at 33%.
Now move down the synth to the lower-middle Insert 1 panel. Ensure the activation button is lit and select Frequency Shifter. Leave the Dry/Wet balance where it is and experiment with the Pitch dial until you get a musical sound – we’ve set it at around 66%.
Audio PlayerA final trick for these type of mid-range bass tones is to modulate a high shelf EQ for added top-end sizzle.
Turn on the EQ (alongside the FX slots), and set the High Shelf control so that it’s modulated by 6LFO. (Use the same procedure described above, but this time draging up on the mod box below High Shelf until the green and grey bar covers around 33% of the control.) Now in the 6LFO panel check the sync box and move the XFade Curve all the way to the top so that only a Sine Wave controls the LFO shape. Keeping the speed at 1/16 does the job nicely, but experiment with triplet values as well.
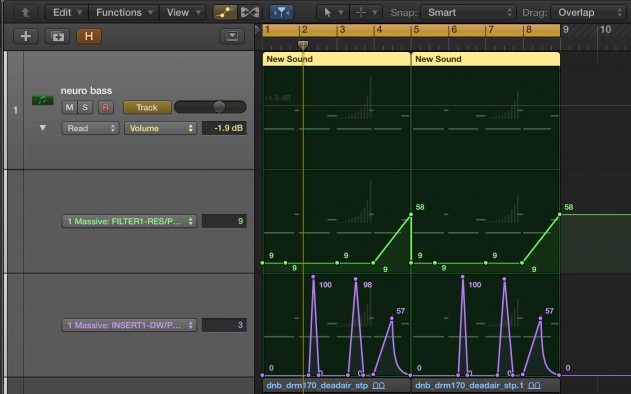
To bring the raw sound alive, add automation. In this example we’ve automated the Dry/Wet of the FrqShift effect (Insert 1) and also the Resonance of Filter 1.
Audio Player
19th August, 2015

u-he are makers of award-winning software synthesisers and effects including Diva, Repro-1, Zebra2, Hive, Bazille, Presswerk and Satin.
Download the demos and try them for yourself at www.u-he.com
Attack Magazine is funded by advertising revenue. To help support our original content, please consider whitelisting Attack in your ad blocker software.
x