u-he are makers of award-winning software synthesisers and effects including Diva, Repro-1, Zebra2, Hive, Bazille, Presswerk and Satin.
Visit U-he

u-he are makers of award-winning software synthesisers and effects including Diva, Repro-1, Zebra2, Hive, Bazille, Presswerk and Satin.
Visit U-heSynth Secrets is a series of programming tutorials in which we show how to make a range of classic and new synth sounds using plugins such as Massive, Sylenth and Predator.
In this instalment of Synth Secrets we’ll be creating a warping bass sound. It’s a distant cousin of the kind of wobble bass that dominated dubstep production circa 2009, but don’t let that put you off. Similar techniques were commonplace in garage and drum and bass long before dubstep was invented. This is a more modern take on the idea, lending itself nicely to garage-influenced house styles.
Here’s an example of the sound we’ll be making:
Audio PlayerAnd here’s the MIDI we’ve used:
We’ve chosen Massive to create this sound because it’s great for gnarly, aggressive tones. Initialise the patch by selecting New Sound from the File menu, then head straight to the oscillator section and select the Screamer wavetable for Osc1. (If you haven’t already read our guide to Massive’s wavetable oscillators, make sure you check it out.)
Take the Wt-position setting up to around 75% and bring the Amp control down to half way, then change the mode from Spectrum to Bend-/+. This gives us a nicer tone for the oscillator.
Now turn up the Amp setting for Osc2, leave it set to the Squ-Sw1 wavetable and bring the Wt-position setting all the way down to zero. Bring down the pitch of the oscillator to -24.00 (two octaves down).
For Osc3, turn up the Amp setting and select the Sinarmonic I wavetable. Turn the Wt-position setting up to about 60%, bring the Intensity to just before half way, and take the pitch down to -24.00.
Audio PlayerNow, in the Filter section, select the Daft filter for Filter 1. Bring the cutoff and resonance settings to about 25%. Now let’s use an LFO to modulate the cutoff frequency and add that warping movement to the sound. Click and drag the green crosshair from 5 LFO in the modulation section and drop it in the first modulation box underneath the cutoff frequency control. You should now see a green number 5 in the box. Click and drag up on this until the green bar goes to about quarter of the way round the control.
Check the Sync box to sync the LFO speed to the host tempo, then click and drag on the two boxes underneath Ratio, changing the top box to 3 and the bottom box to 16. This gives the LFO a nice triplet feel.
Take the XFade Curve slider all the way to the top to set the LFO to a pure sine wave. Clicking and dragging the big sine wave left and right will now adjust the start point of the LFO wave, retriggered each time you play a note. Experiment with this until you start to get the sound you’re after.
Audio PlayerNext, change the routing of the filters from parallel to serial by moving the Ser-Par slider all the way to the top. This means the sound from the oscillators is passing through Filter 1 and then into Filter 2, so the output of Filter 1 affects the input of Filter 2. The LFO modulation effect of Filter 1 will remain in place as we set up Filter 2.
Now, in Filter 2, select the Comb filter. Having a subtle comb filter effect on the sound works nicely. We’ll set the Pitch control to around 30% for this particular sound, but be sure to experiment with moving the pitch control around for some flanger style effects.
Head over to the Voicing tab and check the Monophon box to make the sound monophonic (meaning we can only play only one note at a time, perfect for bass sounds). Now, over on the Osc tab, take the Glide Time to about 30%, so the pitch gradually transitions between notes rather than jumping straight to the pitch. For a consistent bass sound, check the Restart Via Gate box so the oscillator phases retrigger for each new key press.
Now for some effects to add depth to the sound. In the FX1 slot, load the Dimension Expander, keep the Dry/Wet control at the half way point and bring the size right down.
In the FX2 slot, load the Small Reverb effect. Reverb effects are not standard practice for bass sounds, but in this instance we’re keeping it so subtle that it adds some nice space and depth without making the sound muddy. Pull the Dry/Wet control down to about 30%, keep the Size at 50%, push the Density up all the way and bring the Color down to about 30%.
You may need to turn down the master volume in Massive now, as the added effects will probably be pushing the sound into the red.
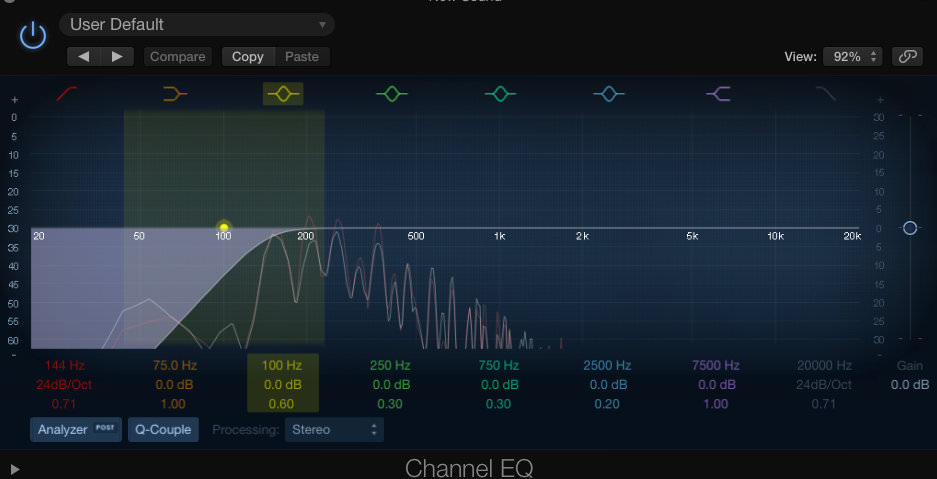
Audio PlayerFinally, a couple of additions just to polish off the sound. First, add an EQ to roll off some of the low frequencies, leaving space for the kick drum.
We’ve also used Fabfilter’s Saturn to add some distortion to the patch. Saturn is a multi-band distortion effect, so we’ve used it here to add some drive only to the mids and highs of the bass patch, leaving the lower frequencies untouched, which adds grit and character without making the low end muddy.
The final thing to do is automate the LFO frequency for extra movement and interest. As you can see from the screenshot, subtle LFO automation can add nice variation. If you have a MIDI controller keyboard you could also assign the mod wheel to LFO speed.
Audio Player30th September, 2015

u-he are makers of award-winning software synthesisers and effects including Diva, Repro-1, Zebra2, Hive, Bazille, Presswerk and Satin.
Download the demos and try them for yourself at www.u-he.com