It’s Just A Phase
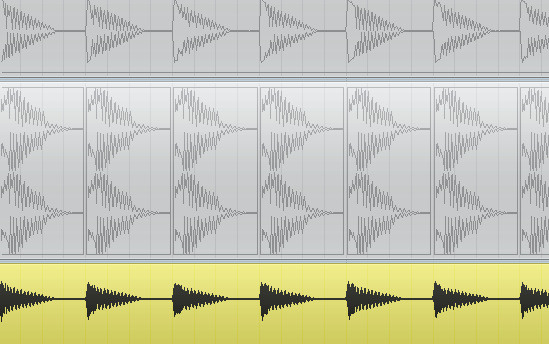
Unfortunately, there are hidden dangers when layering kicks. The first is phase cancellation. This is when sections of the waveforms in your kick samples are out of phase with each other, effectively cancelling each other out and potentially making certain frequencies of your samples becoming quieter, giving a ‘thin’ sound when the two kicks are layered together. In fact, it’s quite possible to combine two fat kicks and arrive at something lacking low end!
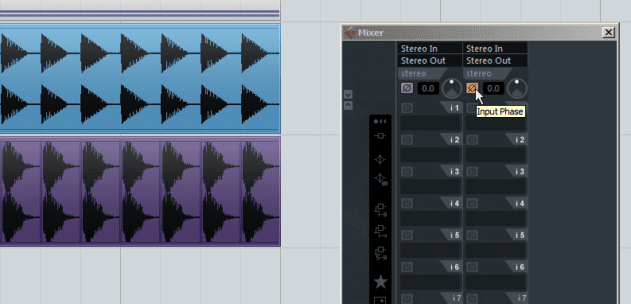
A good place to start checking for phase cancellation is your DAW’s polarity inversion button, often (erroneously!) labelled as phase inversion. Here’s where to find it in Cubase (click images to enlarge):
If your DAW’s mixer doesn’t have this feature, then there are many plugins that allow you to do something similar. Try the Gain utility in Logic or Sonalksis’s excellent FreeG plugin.
Leaving your original kick unchanged, listen to what happens when reversing the polarity of the second kick sample.
Here’s how our layered kicks sound with ‘normal’ layering, leaving the polarity of both channels untouched:
Audio PlayerAnd then how they sound with the polarity of the second kick drum inverted:
Audio PlayerDeciding whether the kicks work best with the polarity of one sample inverted is a simple case of trial and error: invert the polarity and if it sounds better stick with it.
It doesn’t particularly matter whether you invert the polarity of the first or second kick; the effect is virtually identical. Similarly, bear in mind that inverting both has virtually the same effect as inverting neither!
Note that polarity isn’t quite the same as phase (although the terms are often used interchangeably). We’ll come back to the deeper significance of that point in the future, but for now it’s important because changing the relative timing of the two samples will also affect their phase relationship, regardless of how you set the polarity inversion buttons.
The best approach is to fine-tune the timing of the two samples first, making sure you’re happy with the way their transients line up with each other (i.e. that the combined result sounds like a single hit rather than two hits slightly out of time with each other), then
check for phase cancellation using the polarity inversion button.


04.26 PM
Thanks for sharing this. Is it common to use stereo kick samples? I always track my kicks out of my drum machine in mono.
04.34 PM
Hi Joel. Generally speaking, it’s best to keep lower frequencies in mono for a variety of reasons (we find it very difficult to perceive the stereo position of low frequencies and keeping low frequencies in mono allows you to use the full bandwidth of each stereo channel for maximum impact – very important for kicks).
Keeping your kicks in mono is definitely the safest approach, although there are cases where including some stereo information in the higher frequencies of the kick can also work well. Try experimenting with layering stereo sounds to add the ‘click’ on top of a mono kick, for example.
01.16 AM
that inverting phase thing is genious. thanks for the tip. i just tried it. wow!
05.35 PM
Hi, how to inverting phase in Ableto Live? tnx in advance
03.06 AM
Merzad,
Phase cancellation in Ableton Live can be found in the Utility plugin, which also features gain control, a mono-stereo mixer and the voice of god.
07.01 PM
i think in a club or in a crowd ,there will be no mono_stereo difference,someone answer me if i’am wrong,i’am just a trance listener
12.28 AM
This is great information for beginners in kick drum design and will save them alot of time and pain !
I am having trouble finding additional layers to add size, thickness, texture and character in the mids. For example, a classic TR707 top kick is brilliant for its punchy characteristics but even with various mix processing, it can still sound quite small and thin compared to modern layered kicks by top producers.
Where would you go from this point ? (sub and hi freq layer is done)