If you’re not careful, compressing the mix bus can be a fast route to a dull, lifeless track. Bruce Aisher outlines the principles behind creating cohesive, punchy mixes without destroying dynamic range.
There are many approaches to dynamic gain control using compression, from compressing instruments at the recording stage, through compressing individual tracks or buses in the mix, to compressing the master bus itself. The latter is an essential part of most mixdowns, but it’s easy to get wrong.
Producers have tended to fall into two camps when it comes to processing the master bus, with some advocating its use from an early stage (some do it from the very start, their compressor of choice permanently parked on the master bus), to those who see it as something best left to the mastering engineer. Remember also that even this isn’t necessarily the end of the story; the final master may then be subjected to additional compression or limiting by a broadcaster or club rig.
Which is all to say that, at the very least, compression decisions should be taken with care and an awareness of what you’re comparing your own material to. In this article we’ll consider exactly what we’re trying to do and look at some of the best ways to achieve cohesive, punchy mixes using stereo compression across the mix bus.
What does mix bus compression do?
As with any form of compression, mix bus processing effectively flattens the peaks of your signal, reducing dynamic range.
At this point it’s worth a quick refresher on perceived loudness. When we can glance at the level meters in our DAW to check that we’re not overloading anything, these generally only give us an indication of peak level. Peak level meters give us little idea of loudness, or to be more accurate, our perception of loudness.
It’s perfectly possible to have two tracks that both peak at just below 0dBFS (a digital system’s maximum achievable level), and for one to be noticeably quieter than the other. This is because loudness is dependent on a range of factors, including sound pressure level and duration of sound, which means that by manipulating the dynamics of a track we can make it appear louder without overloading the signal chain.
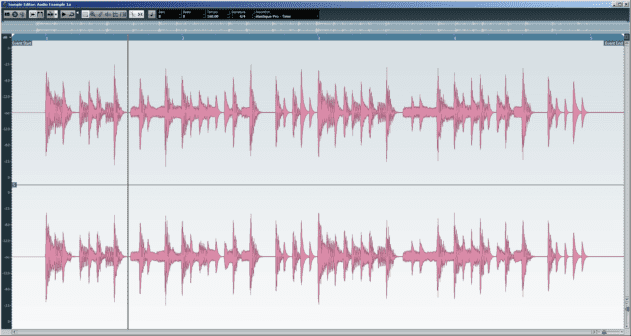
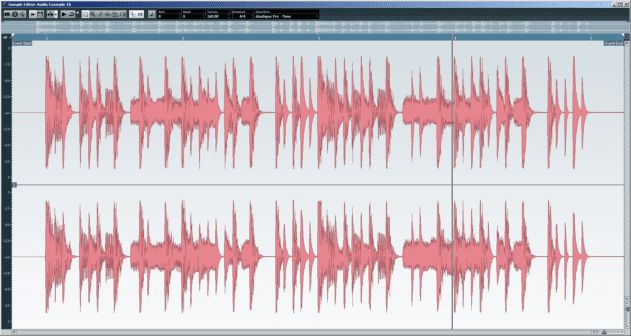
A good, approximate indication of the relative loudness of two tracks can gleaned by looking at their waveforms side by side in a DAW. The louder track will be much denser. Here’s an audio track before processing, peaking at just below -1 dBFS:

And the same clip again after processing, again peaking just below -1 dBFS:

Mix bus compression will play a part in increasing the apparent loudness of our tracks, but as we’ll see it’ll also increase punchiness and help to ‘glue’ the individual elements together – a subtle effect which makes the whole track seem more cohesive.
How does mix compression work?
Audio compression as applied to the mix bus needs to be considered in a different way to compression on individual mix elements (or even sub-grouped mix stems).
A compressor, at its most basic, is an automatic volume control whose operation is dependent on the level of the incoming signal. This means that the more sounds that are mixed together prior to its use, the more that any one sound in the mix can determine the compressor’s overall effect.
Low frequency material requires more energy to be heard – a greater movement of air needs to occur – and also tends to be mixed louder in dance music in order to achieve greater impact. As a result, the bass elements in a mix are most likely to push the compressor into action.
The last of these three clips demonstrates the most extreme form of compression, with the bass drum ‘kicking’ the compressor into heavy gain reduction.
There are ways around this ‘pumping’ effect, though when used appropriately, and in moderation, this side-effect of the compression process can be beneficial. And used to extremes you can get seriously pumping mixes – without the use of a sidechain.
Hands-on
Let’s start with the UAD Precision Buss Compressor, a relatively simple broadband compressor (the most common type to apply across the full frequency range – if you don’t have the UAD plugin, use your DAW’s stereo mix compressor).
Set it for a 2:1 ratio with a medium to fast attack and moderate release as shown in the screenshot below. Slowly lower the threshold (the level at which the compressor kicks-in) until the gain reduction meter shows about 4-5db of compression.
Next move on to the release setting. This, perhaps more than the other controls, needs to done whilst listening to the track. The aim is to get the compressor to work in tandem with the groove of the music, so that the gain reduction is applied during peaks, but has time to recover before them.
(Incidentally, a nifty trick if you can’t hear the impact your tweaks to the release time are having on the material is to either increase the ratio or adjust the threshold value temporarily so that the effect of the compressor becomes considerably more obvious. This will allow you to make informed adjustments to the release and attack values that work with the nature of the material you’re working on. When you’ve got the right settings you can the return the threshold and/or ratio settings to where they were before.)
Faster, busier tracks will require shorter release times. Making the release too long here will merely lower the level of the whole track, acting as little more than overall gain reduction.

The Attack time also benefits from a little tweaking. If the attack setting is too fast, the transients of each sound will be ‘squashed’ and the track will start to lose punch, especially with higher gain reduction settings.

12.30 AM
These walkthroughs are truly excellent and very helpful. Many more of the same please especially on EQ, Comp and Mix Tricks
08.15 PM
Nice read ..The understanding of Compression always brings me back to something I am not doing .. Self taught..Thanks
04.10 PM
This is very good stuff! Thanks for sharing!
07.36 PM
I LOVE THIS SITE. Truly! HIdden gem! Just a question – what is your opinion on adding limiting/compression to the master channel before beginning the track? Some advise doing it, others don’t …
09.26 AM
@MRSR
There are no rules here. As you say, some producers don’t do it, some are vocally anti it, and I would guess the majority probably do it. Of those who do it, some almost ‘mix to master’ – hitting the master processors hard to shape their sound – while I would say the majority use some processing – probably a bus-style compressor with some nice colouring EQ – but keep it subtle. This feels the best way to go; it gives the mastering engineer more space with which to work and it retains dynamics. But it depends hugely on what kind of music you make and the kind of sound you’re after.
Dave@Attack.
05.25 AM
Attack – following the above question – why would one even apply subtle bus-style compression and/or EQ on the master above leaving it completely clean?
Surely giving the mastering engineer the absolute maximum amount of latitude to do their work is preferable?
As I understand it, ANY master bus processing progressively limits the scope for mastering tweaks. Yet, you seem to suggest that the majority of producers utilize master bus compression to some extent.
05.25 AM
Also an installment in this series on Limiting would be ace.
09.53 AM
@ Citizen
Master bus compression is an aesthetic decision as well as a pragmatic one. Leaving the master bus completely untouched is an option, but (as a sweeping but reasonable generalisation) most producers prefer the gluing effect and mild loudening which comes from bus compression. If you’re happy with the mix as it is, there’s certainly no need to apply compression automatically, but in most cases it serves a useful purpose.
02.30 PM
just a quick observation, in the above hard/soft knee section…picture are inverted// soft knee should be the gentle curve
07.12 PM
Really Nice tutorial but I do have to take you to task on the awful attempt at dubstep on the bit about the modes on logic’s compressor. The rest of the music is well done but that sounded like one of those clips you hear on vst company’s page when they are trying to sex up a perfectly nice a VA synth as something “to make that music all the kids are listening to”. Some saw waves, an LFO, a filter and a distortion unit are simply not going to produce a wall of bass with dramatically changing timbres…It produces the sound of distorted filter sweeps.
Other than that I really like the feature…keep up the good work.
01.23 PM
Excellent cant wait to focus on this walk through certainly helped me out on EQ side mixes sound lot more pro now
03.34 PM
Hi, good how to, really interesting. I’ve a question for the author 🙂
When you say:
{ A compressor, at its most basic, is an automatic volume control whose operation is dependent on the level of the incoming signal. This means that the more sounds that are mixed together prior to its use, the more that any one sound in the mix can determine the compressor’s overall effect.
Low frequency material requires more energy to be heard – a greater movement of air needs to occur – and also tends to be mixed louder in dance music in order to achieve greater impact. As a result, the bass elements in a mix are most likely to push the compressor into action. }
You recommend to process the kickdrum separately from the other drum elements (like cymbals)? Because of the big difference of the compressor response to the signals (that are different in frequencies, low for the kick drum, high for cymbals)
04.09 AM
I think they got the knee wrong. Higher values are softer, and lower values are harder